Edit Your Organization’s Profile
Context
The organization's profile tile provides program administrators with the ability to configure and update various program settings on the platform.

These settings include:
1. Uploading or Changing your Program Logo
2. Profile Settings:
- Program Name: You can set or modify the name of your program.
- Program Phone Number: Configure or update the phone number associated with your program.
- Program Sender's Name & Address: Customize how the program administrator's name and address appear in system-generated messages or emails received by mentors and mentees.
- Refreshing Invitation Link: Easily update the invitation link used for self-registrations by mentors and mentees.
- Logo: Upload or change the program's logo.
3. Colors & Style:
- Set Up Brand Colors: Customize the brand colors used in different sections of the platform.
4. Members Settings:
- Terminology: Define the terminology used for mentors, mentees, and the act of mentoring as it appears on the platform and in email communications. For example, you can choose between "coach" and "mentor" as the preferred term.
- Permissions: Establish multiple permission settings for mentors and mentees, granting them specific access and capabilities on the platform.
5. Organization Switches:
- Meeting Type Permissions: Configure permissions for different types of meetings within the program.
6. Manage Administrators:
- The main administrator have the ability to assign administrative permissions to other program users through this feature. Please note that this functionality is only available to the main administrator.
These features and settings empower program administrators to effectively manage and customize their mentoring program according to their specific needs.
Edit Settings
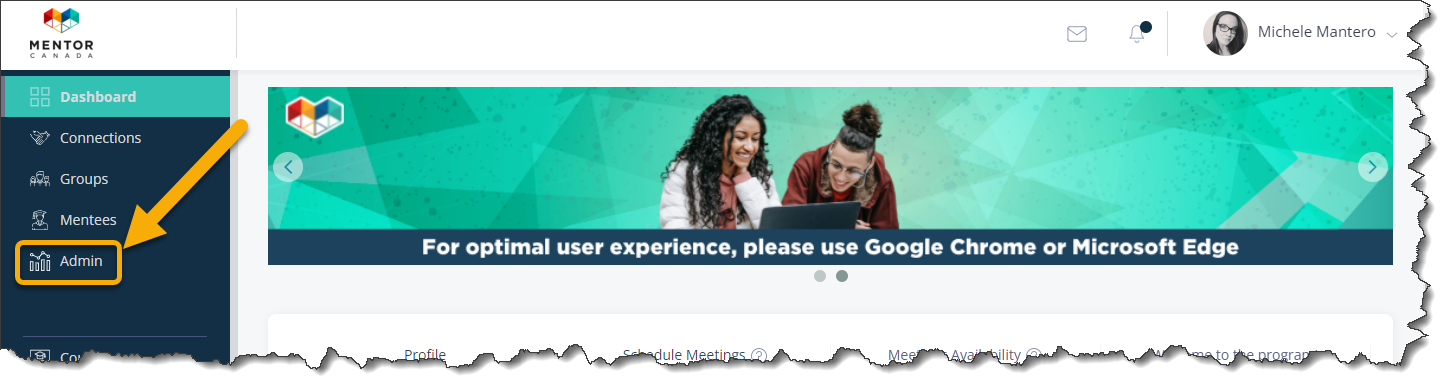
1. Click on the “Admin” tab on the left-hand side of the page.
2. Click “Edit Settings” located on the "Organization Profile" tile on the first row of the administrator dashboard.

3. Make the desire changes to each setting.
Logo
To upload or update your logo on the virtual mentoring platform, simply click the pen icon next to the current logo. If you don't have a logo yet, click the pen icon on the square placeholder.

This action will open a browsing window, allowing you to select a file from your computer. Choose the new logo file and click "open."

The platform will display the newly selected logo automatically, and the changes will be saved instantaneously.

Profile Settings
After clicking on "Edit Settings," you will be automatically directed to the "Profile" tab.
Program Name
Adjust or revise the program name in the left field for the English version and provide a French translation in the corresponding field on the right (if applicable).

Email from Name and Email from Address
These fields serve as labels for email communications originating from the virtual mentoring platform. They determine the name and email address displayed as the sender on outgoing emails. This applies to both system-generated notifications and emails sent by program administrators via the "Send Message" section.


In the left field, enter the email from name in English, and if applicable, provide the French translation in the right field.

Phone
The "Phone" field enables program administrators to update their program's phone number.

Please note that this number is not visible to mentors and mentees within the virtual mentoring platform. It is collected solely for the purpose of offering over-the-phone support to the program.
Invitation Link
By selecting this option, you can update your program's unique invitation link. This link serves the purpose of inviting mentors, mentees, and new program administrators (regardless of user type) to join the platform through self-registration.
To refresh the link, all you need to do is mark the checkbox labeled "Create a new Invitation Link" and then click on the Next button located at the bottom of the page.

Hide French
If your program is not bilingual, you can hide French content by selecting the checkbox next to "Hide French." This option allows you to conceal any French language elements within the program. Click on the Next button located at the bottom of the page to save.

When you check the checkbox next to "Hide French" to hide French content in your program, it's important to note that the French Toggle button will no longer be available to users. This means that users will not have the option to switch between English and French languages when the "Hide French" option is enabled.

Connect Your Microsoft Teams Account
If your organization is on the Microsoft TEAMS environment and would prefer to have your program members using TEAMS for meetings, you can now connect your TEAMS account to MentorCity.
Important: Depending on your organization security set up, MentorCity's video conferencing may not work with Microsoft TEAMS until the organization security/technical support team has whitelisted MentorCity.
Click Connect your Microsoft Teams Account and follow the instructions on screen. To learn more about this feature and setting up other meeting type permissions please read the Meeting Type Settings article.

Colours & Style
After finishing the configuration of settings on the "Profile" tab, proceed by clicking on the Next button located at the bottom right of the page.

This will save your changes and take you to the next tab, "Colours & Style," where you can customize the platform's appearance by incorporating your brand colors.

Brand Colors

1. Main Header Color: Refers to the color of the left-hand side menu and all platform clickable buttons

2. Font Color: Refers to the font color
3. Active Color: Refers to the color that appears when hovering on the left-hand side menu options
4. Links Color: Refers to the color of all clickable links
When adding your brand color, ensure to enter the HEX code, meaning the code including the # in front of the color code. i.e. #132f45
Furthermore, when clicking on the color box, program administrators also have the ability to select a color using a color chart.

Once you are done setting up your brand colours, click Next to save and move on to the next tab which is the "Members Settings" tab.

Members Settings
This section allows you to customize your mentoring program in various ways. You can define the terminology used for mentors, mentees, and mentoring throughout the platform and email communications. Additionally, you have the ability to set different permissions for mentors and mentees, granting specific access and capabilities. You can enable or disable self-directed search for mentors and mentees, control the sending of mentoring invitations, and choose whether to activate or hide the Members search section.

Terminology
The following fields enable you to customize the terminology used for mentors, mentees, and the act of mentoring within the platform. These fields allow you to establish your program-specific "lingo" and ensure consistent references throughout the platform. The left fields are dedicated to English terms, while the right fields provide the option to enter corresponding French translations, if applicable. This customization feature helps align the platform terminology with your program's unique context and enhances the user experience for participants.

Example

Mentors & Mentees' Permissions
To assign specific permissions to mentors and mentees, simply check the boxes next to each permission set displayed on the screen.

If you require more information regarding permissions for self-directed matches and the ability to send invitations, please refer to the Match Mentors & Mentees article.
Similarly, for detailed instructions on enabling the Members search feature, please consult the Members Search Section article. These resources will provide you with comprehensive information and guidance on managing permissions within the platform as well as explaining these features in detail.
Click Next at the bottom of the page to save your changes and move on to the next tab "Organization Switches".

Organization Switches
The Organization Switches section within the platform offers program administrators the ability to configure meeting type permissions for mentors and mentees. This includes options such as video conferencing, phone calls, and in-person meetings. By enabling specific meeting types, mentors and mentees gain the flexibility to choose them when scheduling meetings using the "Schedule Meeting" widget.

Meeting Type Permissions
To grant meeting permissions, simply click the toggle button next to the desired option. The button will display a check mark and change color once enabled. Conversely, to disable a meeting type, click the toggle again until an X sign appears and the button turns grey.

No additional action, such as saving or clicking Next, is necessary as the change is automatically saved upon toggling. For more detailed information on the various meeting types, please refer to the Meeting Type Settings article. This resource offers comprehensive insights into each meeting type and its functionalities.
Manage Administrators
The Manage Administrators tab within the platform offers the main administrator the capability to assign administrative permissions to other program users. This functionality, exclusively available to main administrators, allows for efficient delegation of administrative tasks.
It is important to note that other administrators will not have visibility of this tab, ensuring that only the main administrator has access to this administrative privilege.
To access this section, there is no Next button from the previous section "Organization Switches." Simply click on the "Manage Administrators" tab, located within the "Organization Profile" tile, to enter this dedicated section for assigning administrative permissions.

Within this section, the main administrator will find a list of users, with the option to navigate through the pages using the page numbering at the bottom. As there is a limit to the number of users displayed per page, this feature enables easy access to additional users.

You can also search for a specific user if you are presented with numerous pages of users.

By utilizing the drop-down menu next to a user's name, the main administrator can modify their role. To save any changes, simply click the Save button.

For detailed information regarding the various types of program administrators and their corresponding access levels, please refer to the Create Additional Administrators article. This resource will provide a comprehensive understanding of the roles and permissions within the platform.
If you have questions or need further support, please contact our Support Team: support@mentoringcanada.ca