Streamlined Group Meeting Scheduling
- Context
- Schedule a Group Meeting
- Track Group Meeting Invitation Status
- Follow-Up with Group Members
- Cancel or Reschedule a Group Meeting
- Administrators: Consolidated View of Group Meetings
Context
The latest feature empowers groups to effortlessly schedule their meetings using the integrated calendar, making group mentoring more efficient than ever before. Previously, organizing group mentoring meetings on MentorCity required time-consuming coordination among group members to find a suitable date and time. Even after the decision was reached, the meeting remained absent from the mentors' and mentees' calendars within the platform.
Now, with the introduction of group meeting booking through the calendar, this process has been streamlined and simplified.
In this article, we will learn how to effectively utilize the group meeting scheduling feature.
1- Schedule a Group Meeting
Note: It's important to highlight that every member of a mentoring group, regardless of whether they are a mentor or mentee, has the capability to schedule a group meeting. However, it's the responsibility of program administrators to effectively communicate any preferences or restrictions they may have concerning the ownership of meeting scheduling within a mentoring group.
To schedule a group meeting, mentors and mentees can follow these steps:
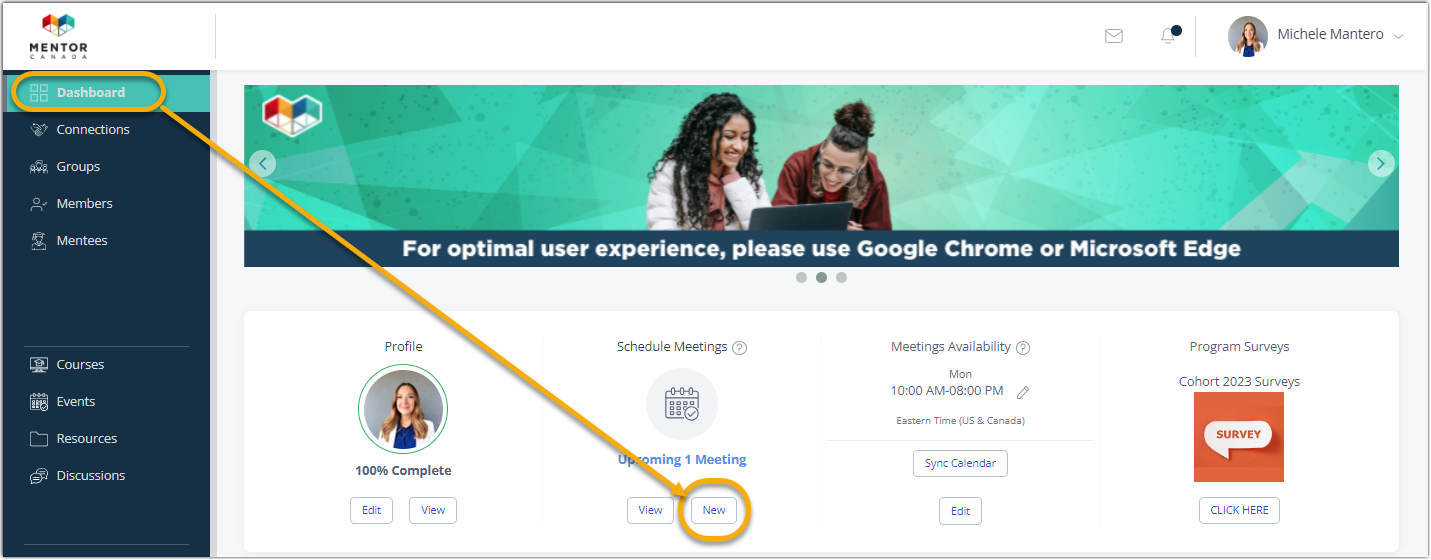
1.0 Access Scheduling:
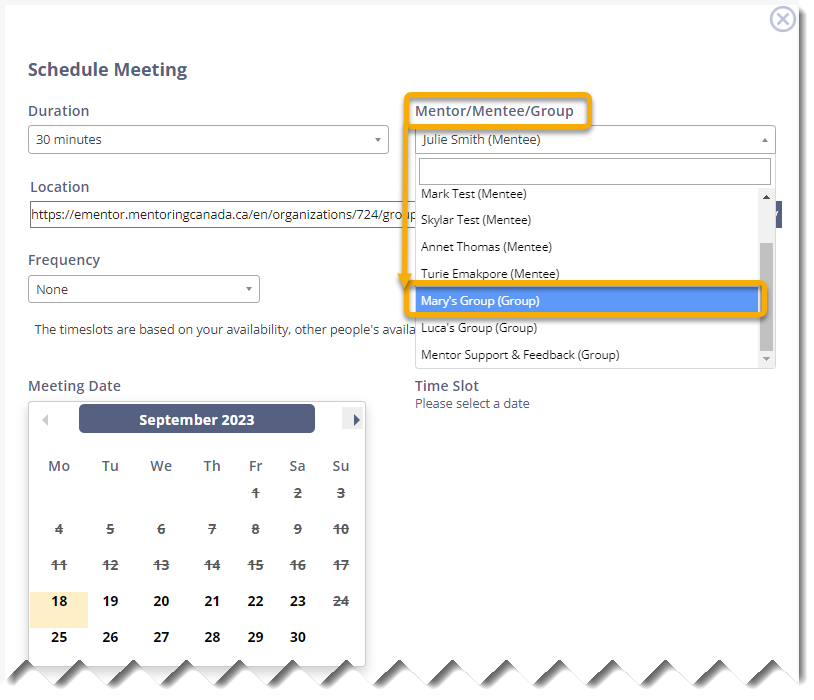
1.1 Set Meeting Details:
- Choose the desired meeting duration using the drop-down menu.
- Based on the Meeting Type Permissions available within your program, choose an appropriate meeting format, such as Video Conferencing or In-person, as needed.
1.2 Select the Group:
- Within the "Mentor/Mentee/Group" field, utilize the drop-down menu to select the name of the group for which you are arranging a meeting.
Note: Group names can be seen solely by program participants who have been added to a mentoring group beforehand.
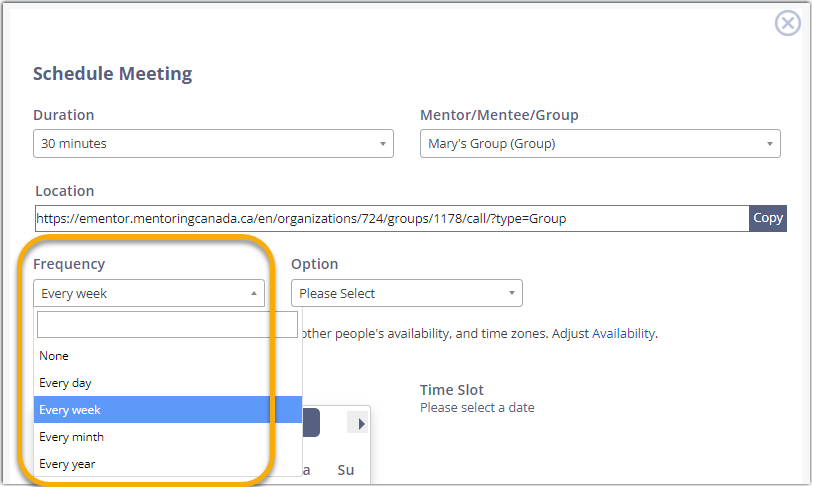
1.3 Choose Recurrence (if needed):
- If you want to schedule a recurring meeting, select the desired frequency.
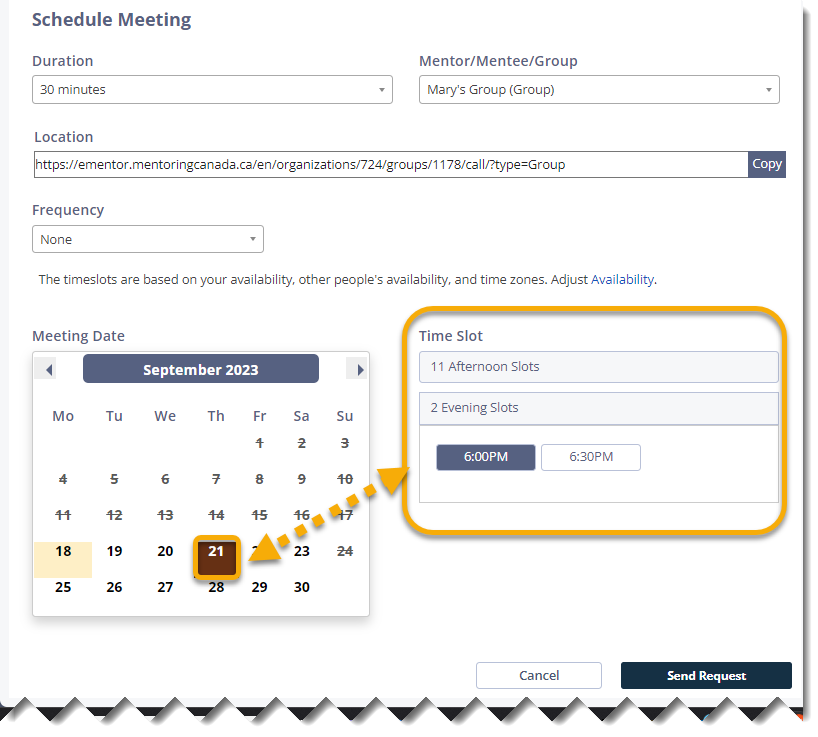
1.4 Select Date and Time:
- On the calendar, pick a date.
- The system will display common available time slots for the group members.
Important: Ensure all group members have set up their availability in advance for optimal booking efficiency. For instructions on how mentors and mentees can set their availability, refer to this article: Mentors & Mentees Onboarding Essentials
1.5 Send Meeting Request:
- Once you've chosen a suitable time slot, click
Send Request.
Important: Please be aware that if a program participant is included in a group after a meeting has been scheduled, they won't have access to the meeting invitation in their calendar. We suggest that the meeting organizer cancels and reschedules the meeting to ensure the newly added group member also receives the meeting in their calendar.
2 - Track Group Meeting Invitation Status
After sending out group meeting invitations, all mentoring group members will receive email invitations, and those using the mobile app will also receive mobile notifications.
Note: Only the meeting organizer has access to view the meeting invitation status for each group member.
Here's how the group meeting organizer can track this status:
2.0 Access Upcoming Meetings
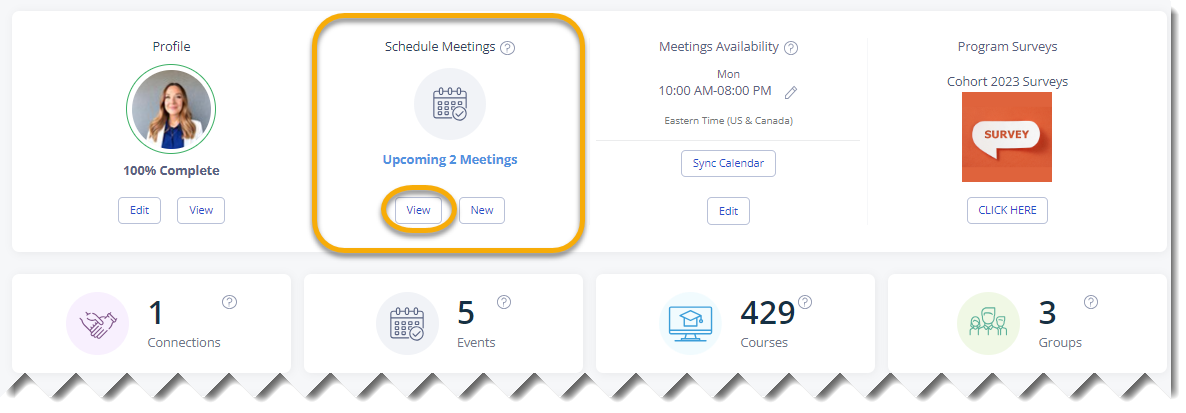
- Begin from your Dashboard and locate the "Schedule Meetings" tile.
- Click on "View" within this tile.
2.1 Filter for Upcoming Meetings:
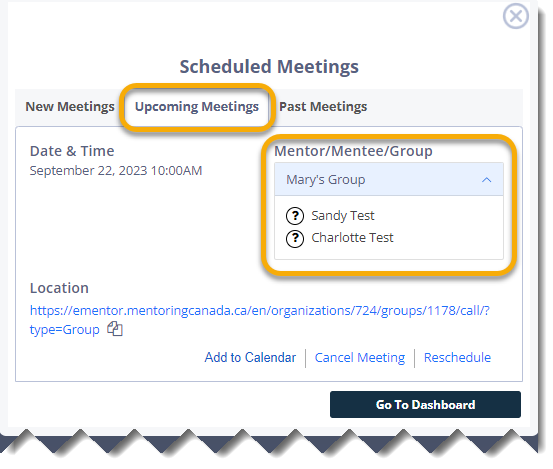
- A window will appear, displaying a list of meetings categorized as "New Meetings," "Upcoming Meetings," and "Past Meetings."
- To track the status of upcoming meetings, select the "Upcoming Meetings" tab.
2.2 Select the Meeting of Interest:
- If you have multiple upcoming meetings, locate the specific meeting for which you want to track attendance.
- Click the "Mentor/Mentee/Group" field's to expand it and view the list of attendees.
2.3 Viewing Attendance Status:
- A list of meeting attendees will be displayed, along with status indicators:
- A green checkmark indicates they have accepted the invitation.
- A red "X" signifies that the invitation has been declined.
- A question mark (?) indicates that they have not yet accepted the invitation.
3- Follow-Up with Group Members
To facilitate communication with group members following a meeting invitation, consider the following options:
3.0 Group Post:
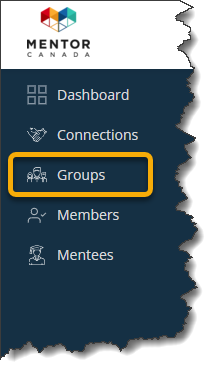
- Access the "Groups" tab in the left-hand main menu of the platform.
- Select the desired group from the list displayed.
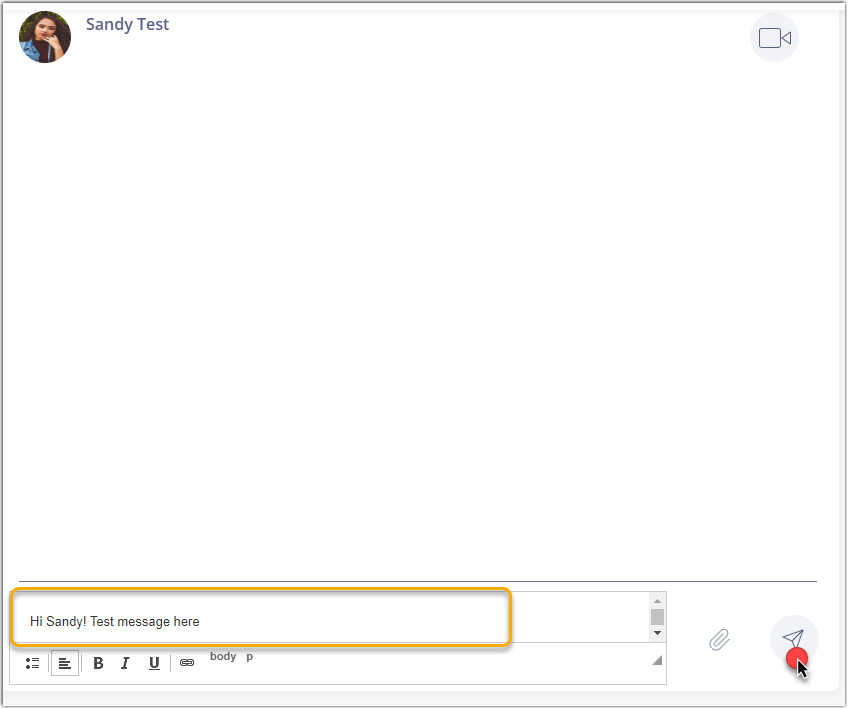
- On the group page, locate the "Send Message" function in the center and compose a brief message as a reminder regarding the meeting invitation and the need to accept or decline.
- Click
Sendto post your message. Note that messages posted in the group are visible to all members.
3.1 Send a Private Message to a Group Member:
- From the group page, identify the group member who has not responded to your invitation. Group members are listed on the right-hand side.
- Click on the name of the relevant group member.
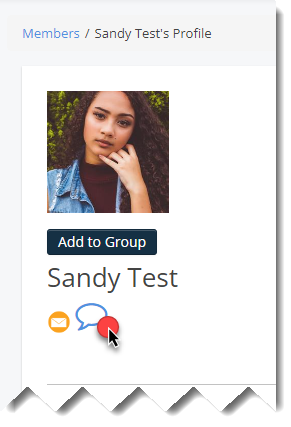
- You'll be taken to their profile overview, where you'll find a small chat bubble icon next to their name. Click the bubble icon.
- Compose your reminder message to the group member and click the "Send" icon.
- The member will receive a notification of your message via email and mobile notification if they have the mobile app installed.
4 - Cancel or Reschedule a Group Meeting
In this section, we'll guide you through the process of cancelling or rescheduling a group meeting on MentorCity.
Note: It's important to note that only the meeting organizer, regardless of their role, possesses the authority to initiate these changes.
To efficiently manage meeting adjustments and ensure seamless communication within your mentoring group, please follow these steps:
4.0 Access Upcoming Meetings
- Begin from your Dashboard and locate the "Schedule Meetings" tile.
- Click on "View" within this tile.
4.1 Filter for Upcoming Meetings:
- A window will appear, displaying a list of meetings categorized as "New Meetings," "Upcoming Meetings," and "Past Meetings."
- To view and manage upcoming meetings, select the "Upcoming Meetings" tab.
4.2 Select the Meeting of Interest:
- If you have multiple upcoming meetings, locate the specific meeting for which you want to track attendance.
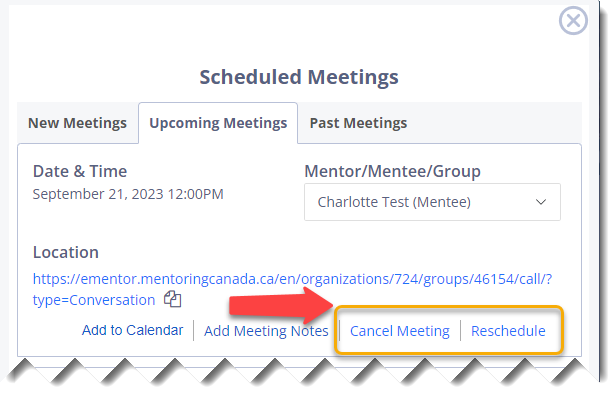
4.3 Proceed with the Cancellation or Change of Date/Time:
- Select "Cancel Meeting" or "Reschedule" within the relevant meeting section.
- Group members will receive email and mobile notifications (if they have the app) regarding this change. If the meeting is rescheduled, they will be prompted to accept or decline once again.
5 - Administrators: Consolidated View of Group Meetings
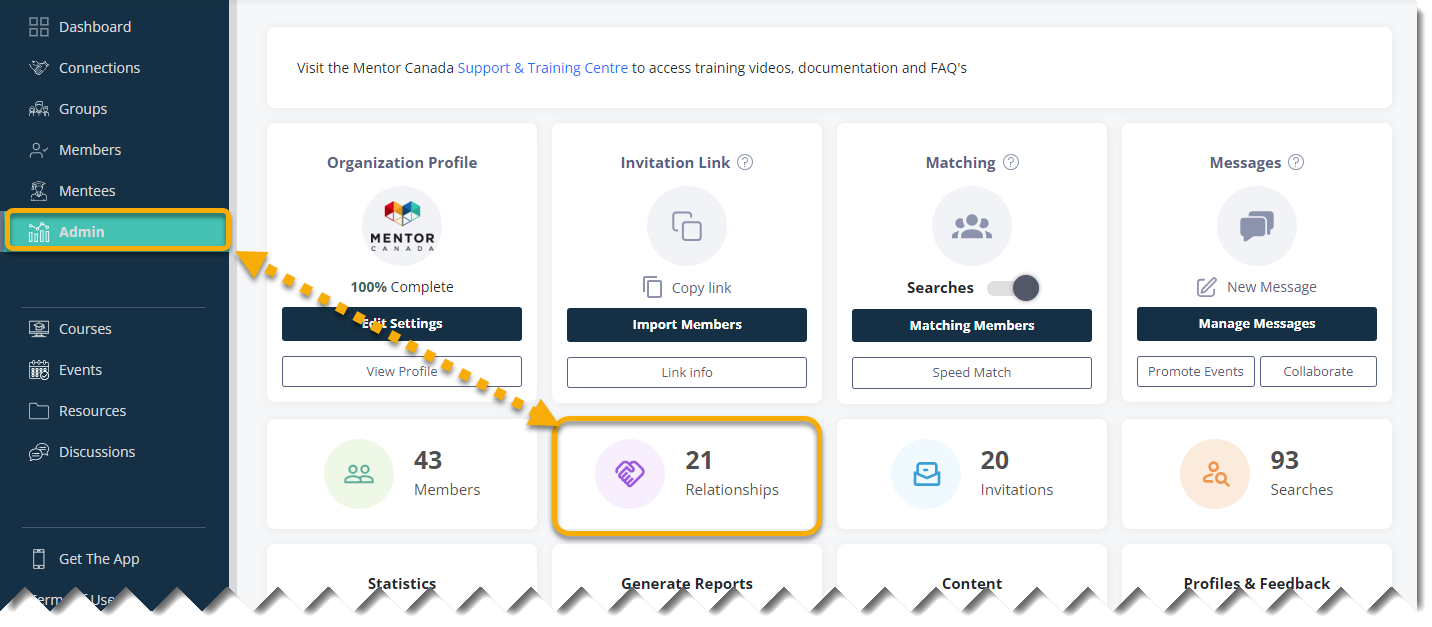
In conjunction with group meeting scheduling, MentorCity organizes and presents scheduled group meetings in a dedicated section on the admin dashboard, separate from the one-on-one meetings tracker. This distinct section simplifies the tracking and management of group engagements.
To access the scheduled Group Meetings tracker, please proceed with the following steps:
5.1 Within your admin dashboard, access the "Relationships" tile, which is positioned on the second row of the dashboard.
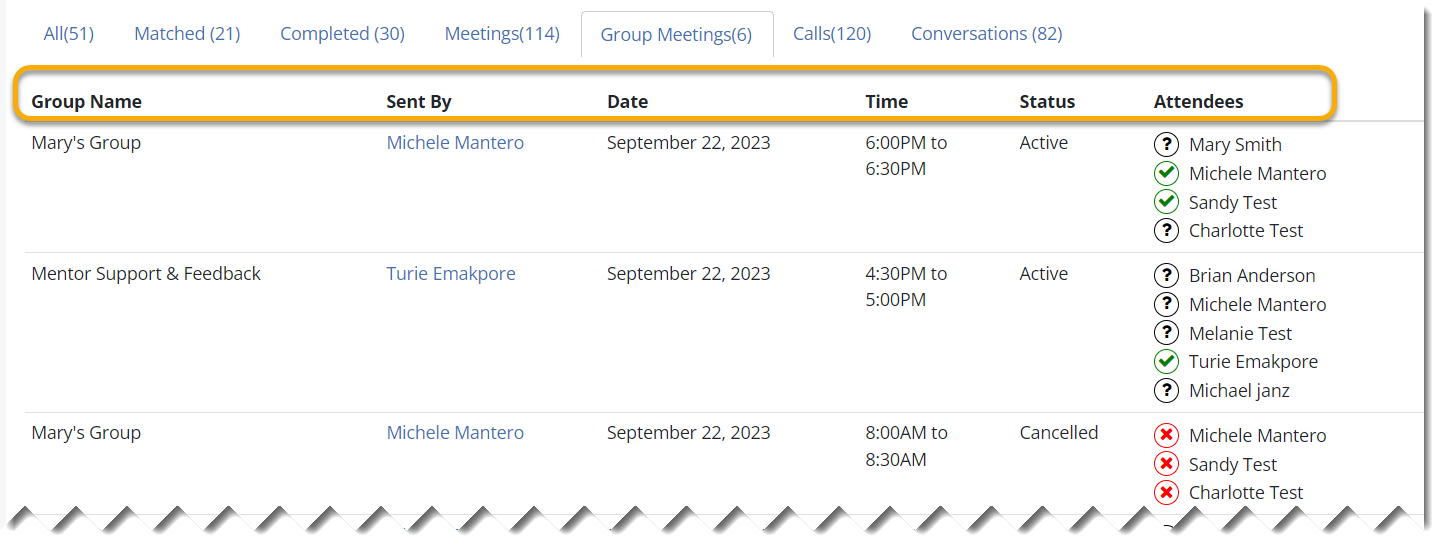
5.2 On the Relationships page, click the "Group Meetings" tab to access information about scheduled group meetings.
5.3 You will be directed to the Group Meetings Tracker section, where you can view the following details for scheduled group meetings:
- Group Name
- Meeting Invitation Sender
- Scheduled Meeting Date
- Scheduled Meeting Time
- Meeting Status
- Attendees (reflecting their attendance status)
There are two statuses:
- Active : The meeting will or did happen.
- Cancelled : The meeting owner cancelled it, or everyone in the meeting declined the invitation with the exception of the meeting owner.
If you have questions or need further support, please contact our Support Team: support@mentoringcanada.ca

