Design Courses & Mentoring Activities
Context
The Courses section of the virtual mentoring platform offers a valuable opportunity for mentoring programs to effectively guide mentors and mentees through specific curriculums or activities. If your program has predefined curriculums or activities that you would like mentors and mentees to complete, the Courses section can serve as a powerful tool. By leveraging this section, you can structure and organize the learning journey, ensuring that mentors and mentees have access to relevant resources, materials, and guidance.
Content Types
In the virtual mentoring platform, program administrators are offered a diverse range of content types to facilitate engaging courses and mentoring activities. These content types include:
- Text
- YouTube videos
- Files (PDF, Word documents)
- Web Images
- Links
- Embed external content (IFrame)
- Surveys
By leveraging these content types, program administrators can create compelling and interactive courses that enhance the mentoring experience for mentors and mentees alike.
In this training article, we will explore the process of creating course content using the various available formats. We will provide step-by-step guidance, tips, and best practices to empower program administrators in delivering impactful and meaningful learning experiences within the virtual mentoring platform.
Note: We recommend designing and creating your courses and mentoring activities before onboarding mentors and mentees. Please note that courses cannot be saved in draft mode during the creation process. If mentors and mentees are onboarded before completing the courses, they may encounter partially developed content as you work on them.
Step 1 – Create the Course
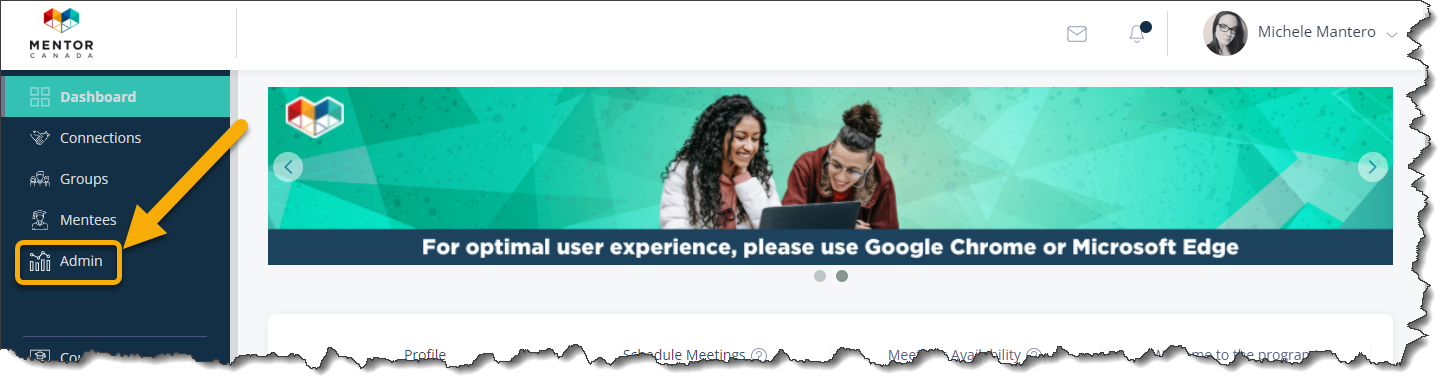
1.0 Click the “Admin” tab on the left-hand side of the platform.

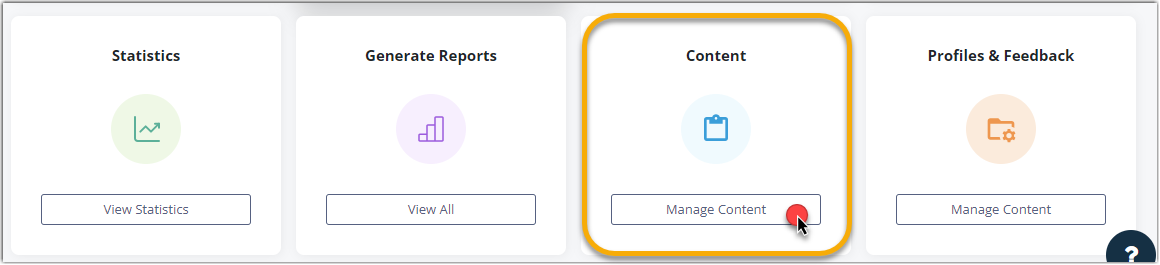
1.1 From the administrator dashboard, navigate to the "Content" tile located on the third row, and click on "Manage Content" to access the corresponding section.
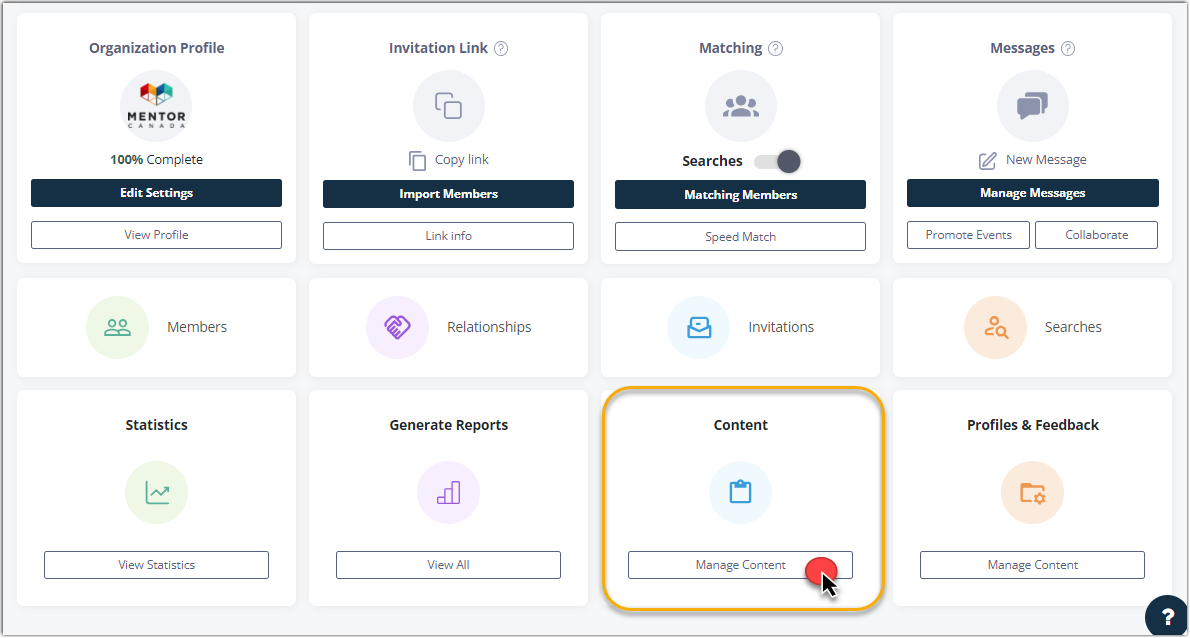
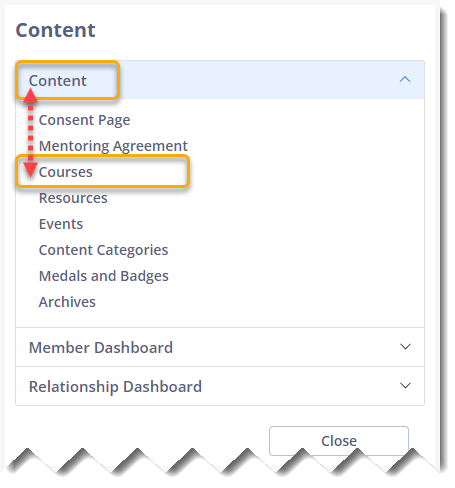
1.1.1 A new dialog box will appear. Expand the selections by clicking on "Content" and subsequently choose "Courses".
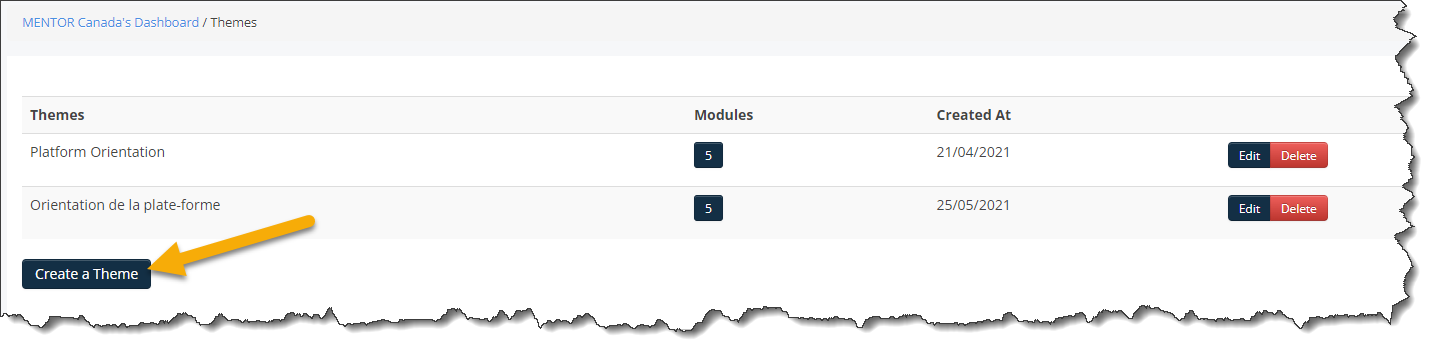
1.2 Click on Create a Theme.
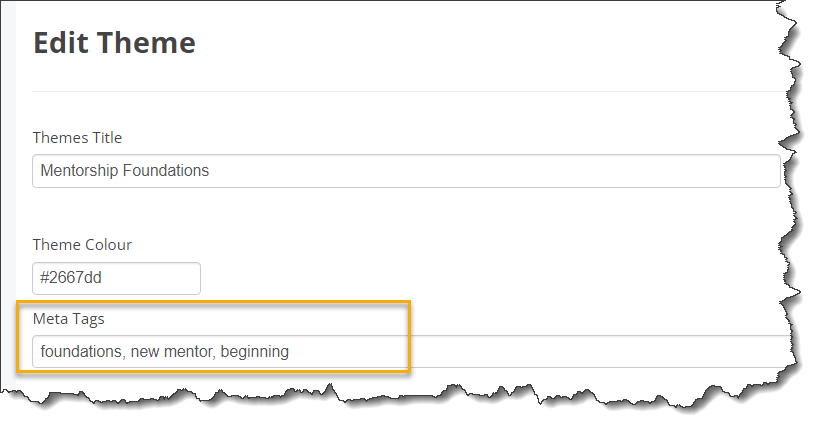
1.3 To set up your course, begin by entering a descriptive name in the "Themes Title" field, and provide a detailed description in the "Description English" field. If your curriculum is also available in French, you can add the corresponding translation on the right-hand side. This ensures that participants can access the course information in their preferred language.

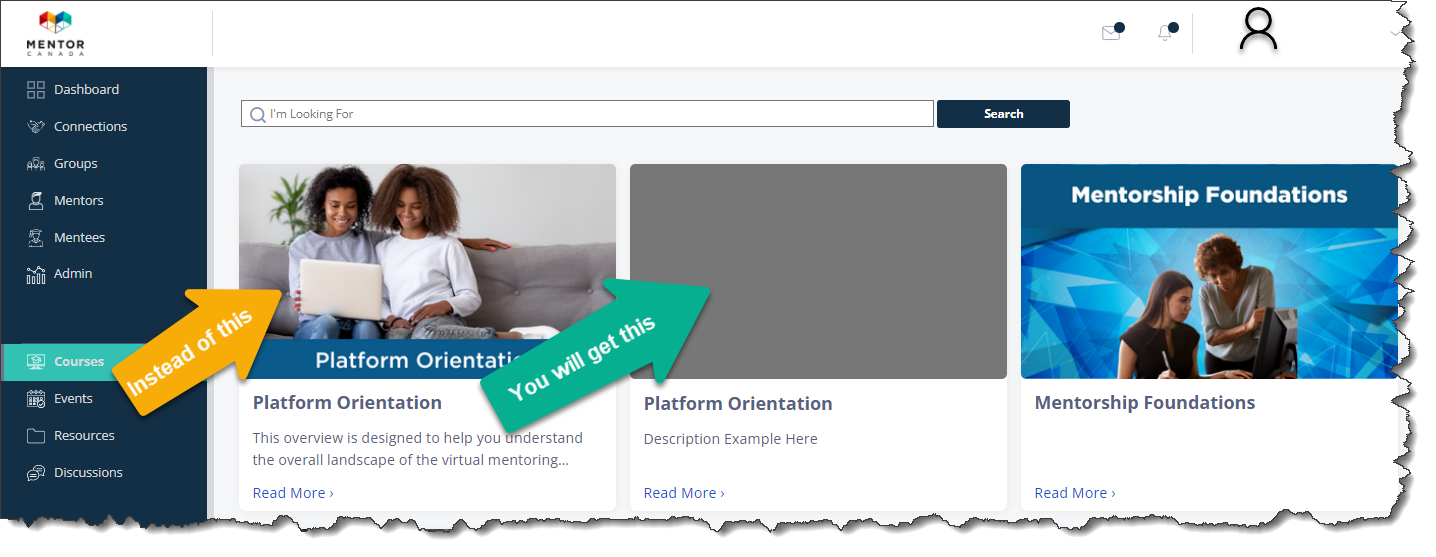
1.4 Optional: Click Choose File to assign an image to the course theme.

Important: For optimal results, it is important to adhere to the recommended image dimensions. Following the suggested image dimensions will help ensure that your images are displayed effectively and appear visually appealing within the course content.

1.4.1 Please note that adding images to your course content is optional. If you choose not to include an image, the course image will be displayed as a grey box, as shown in the example below.
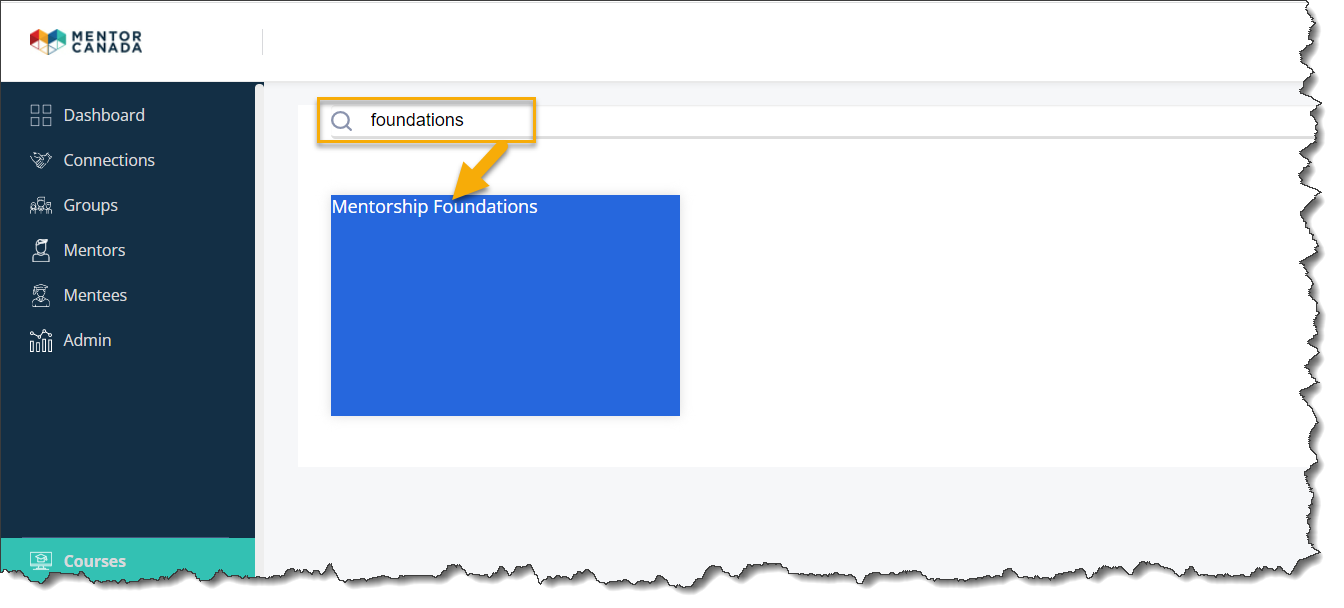
1.5 Optional: Add Meta Tags which are key words that mentors and mentees can use to quickly search and find the course.
Step 2 – Create the Modules
2.0 On the same "Create a Theme" page, you can enter the names of your modules in each "Module Title" field. This allows you to provide a clear outline of your course modules without delving into their specific content. If your course is bilingual, remember to include a title in the French section as well, ensuring that participants can access module titles in their preferred language.
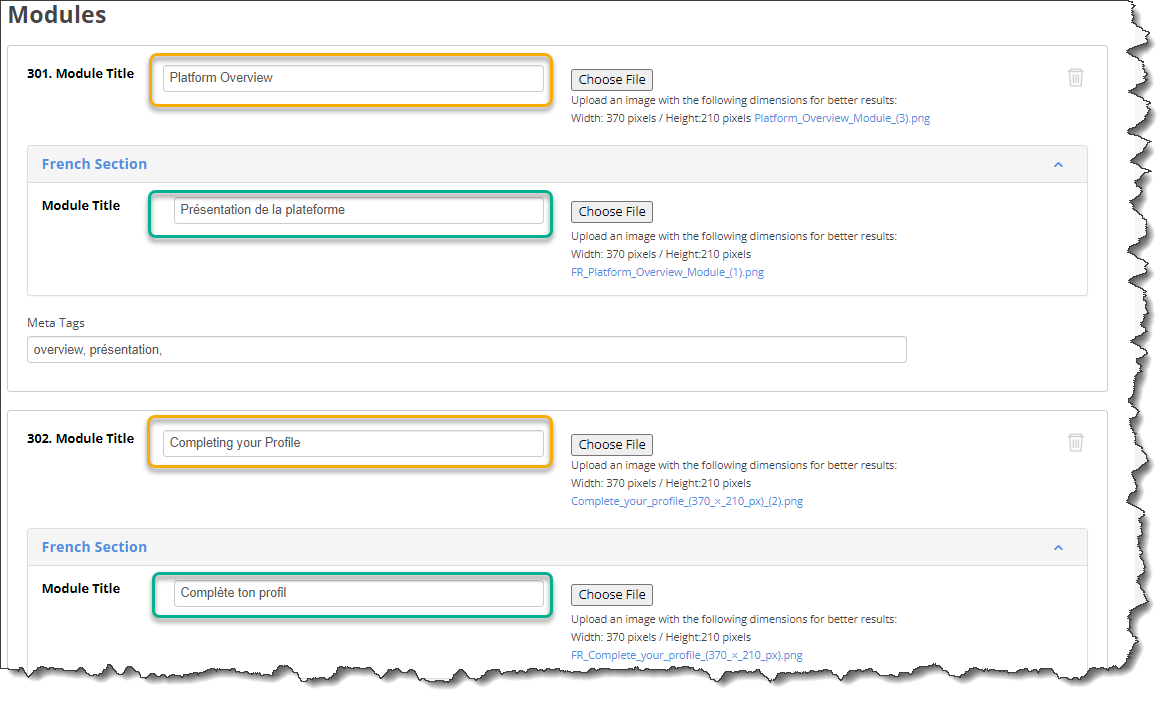
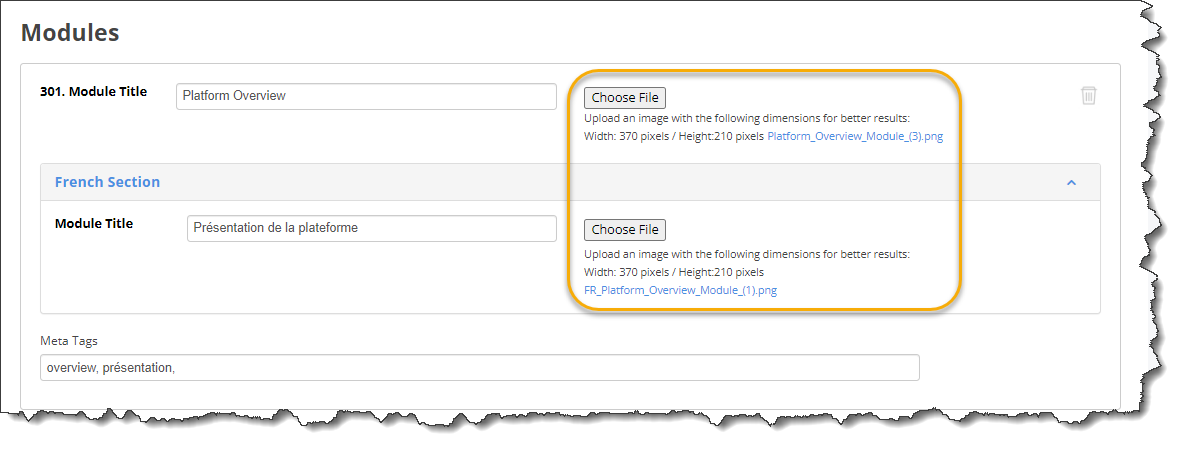
2.1 Optional: Click Choose File to assign an image to the module.
2.2 If you require additional modules, simply click on the Add Module button located at the bottom of the page. This will allow you to include more modules as needed, ensuring that your course content is organized and comprehensive.

2.3 Click Save located at the bottom of the page when you are done outlining your modules and creating your course theme.

Step 3 – Design Module Activities
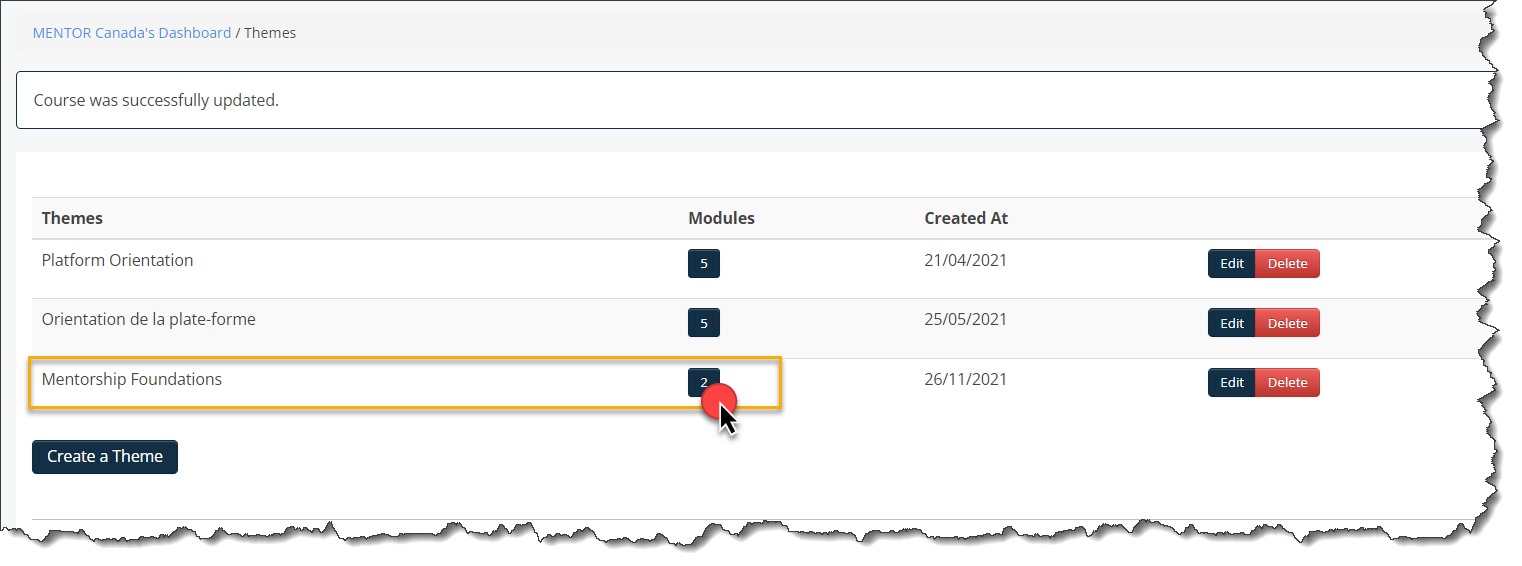
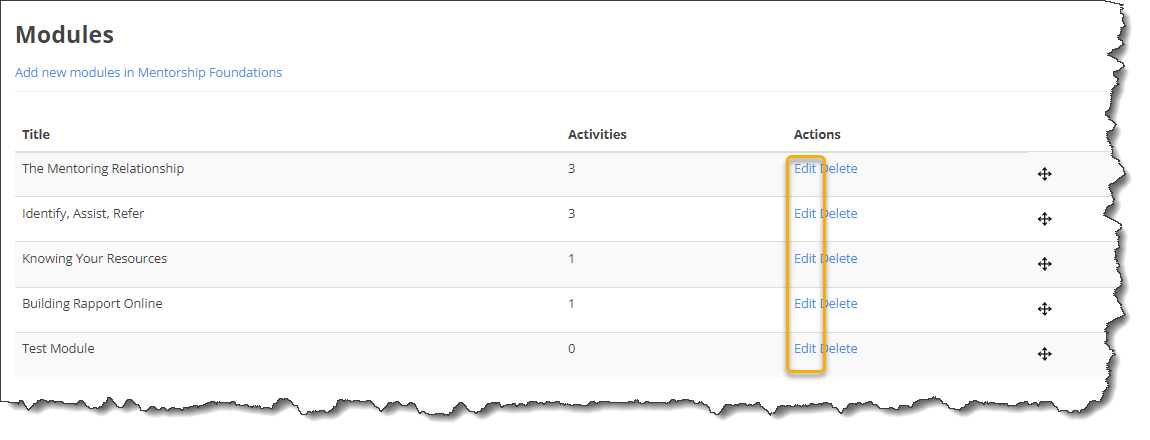
3.0 Once you have created your course theme and its modules, you will be directed to the page displaying all the created course themes. To continue building your course, locate the module number box corresponding to the course you are working on under the "Modules" column, and click on it. This will allow you to access and edit the specific modules within the course.
 3.1 If you already exited the Courses section, here's how you can go back to build the modules' content:
3.1.1 Click the "Admin" tab on the left-hand side of the page.
3.1.2 From the administrator dashboard, navigate to the "Content" tile located on the third row, and click on "Manage Content" to access the corresponding section.
3.1.3 A new dialog box will appear. Expand the selections by clicking on "Content" and subsequently choose "Courses".
3.1.4 You should be back to the page shown in step 3.0
3.2 Click “Edit” under the “Action” column to start adding content to your modules.

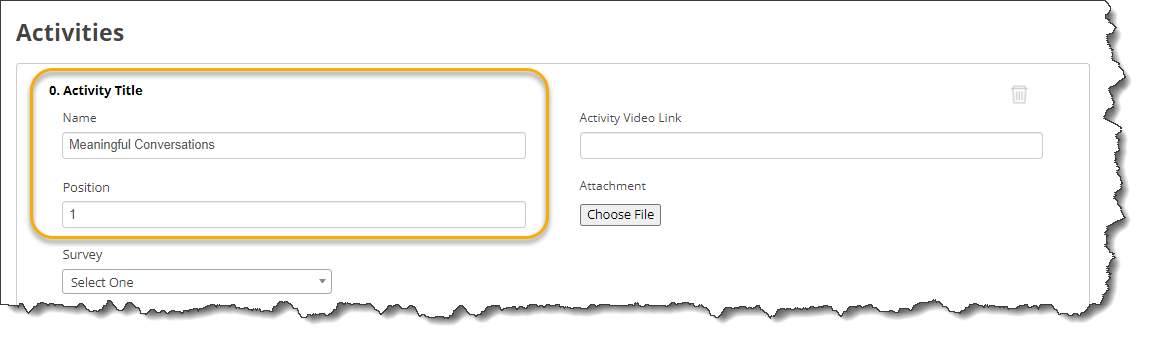
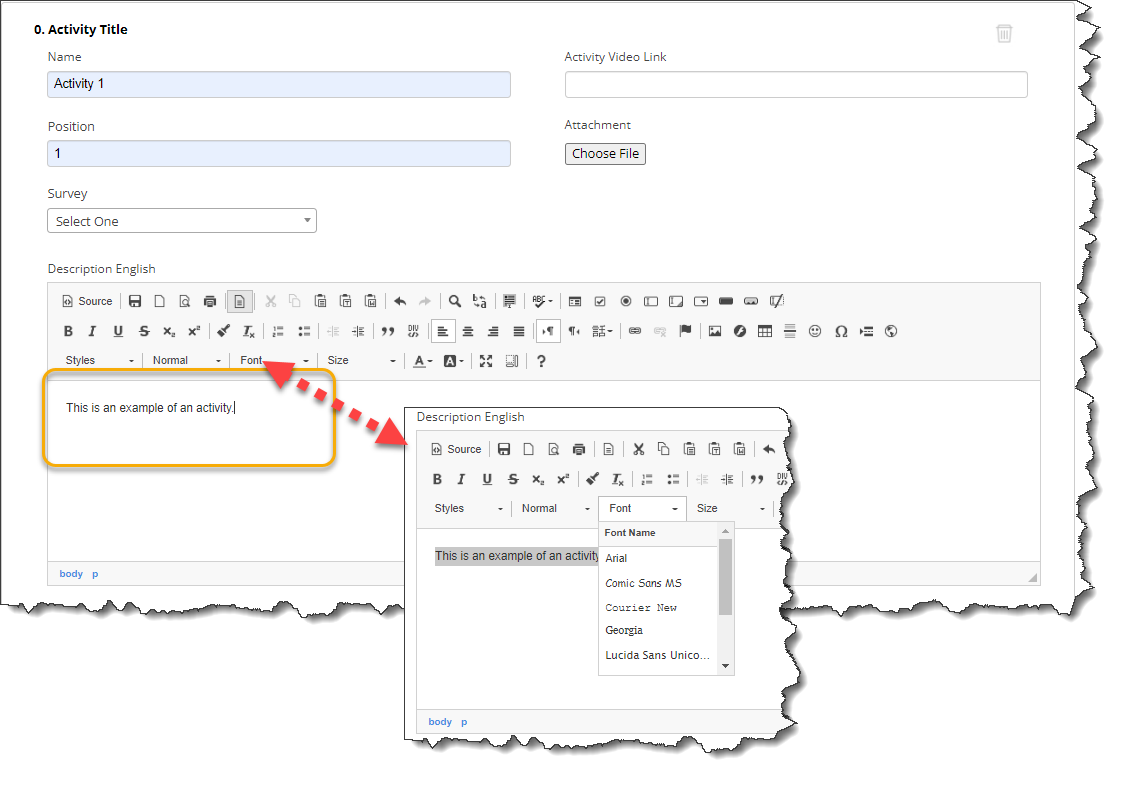
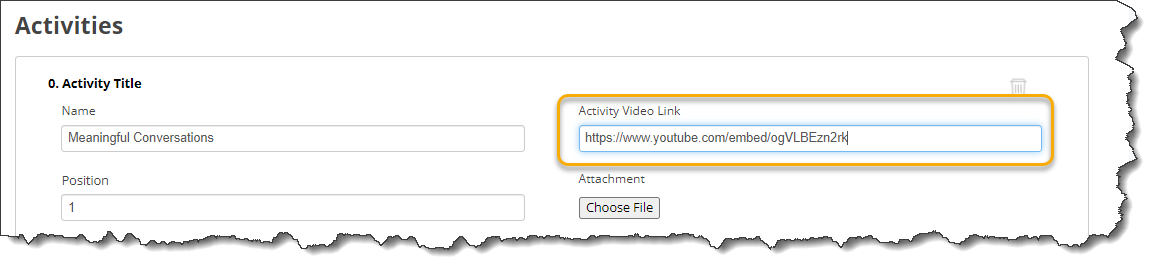
3.3 In the "Name" field, input the title for the activity, and assign a sequence number for its position in the "Position" field. By providing the activity title and sequence number, you ensure that the activity is appropriately listed for all participants.
For instance, in this example, I would like the "Meaningful Conversations" activity to appear first within this module.
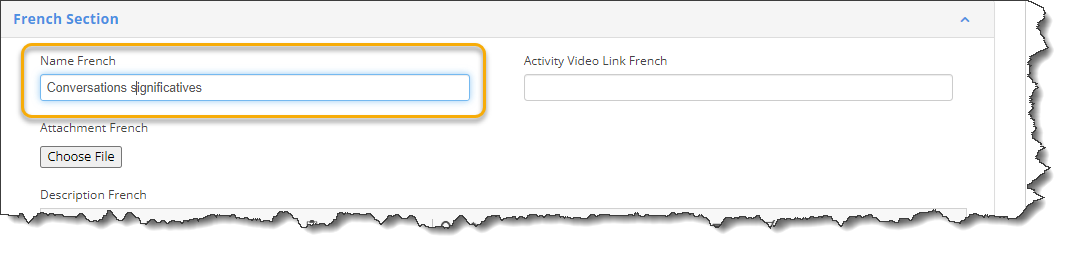
3.3.1 Scroll down and repeat the process in the French Section if the course is offered in multiple languages.
3.4 Click Add Activity located at the bottom of the page to add additional activities to this module.

3.5 Now it's time to create the content for each activity. You can add various types of content such as text, images, videos, and more. Feel free to include multiple content types within each activity, as we will explore in the following steps. However, it is advisable to strike a balance and avoid overwhelming each activity with excessive content. Focus on providing meaningful and engaging content that aligns with the learning objectives of the activity.
Text:
3.6 In the description box, enter your text and utilize the toolbar to format it with various styles, fonts, sizes, colors, and more. This allows you to customize the appearance of your text and make it visually engaging. If your course is bilingual, remember to repeat the process in the French section, ensuring that participants can access the content in their preferred language.
YouTube Links:
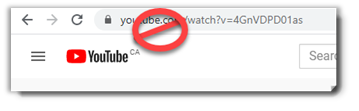
3.7 To incorporate a YouTube video into your activity, utilize the "Activity Video Link" field. However, avoid directly copy-pasting the URL into the field, as it may result in an error.
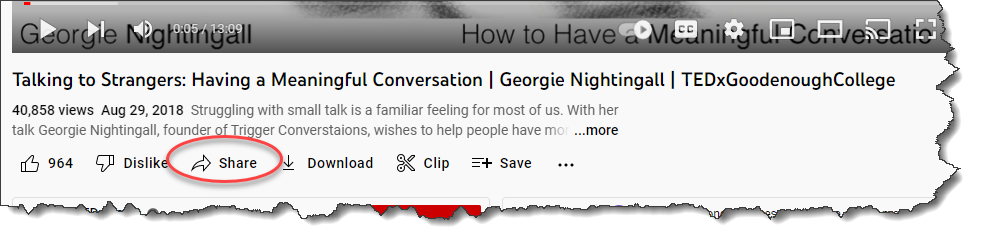
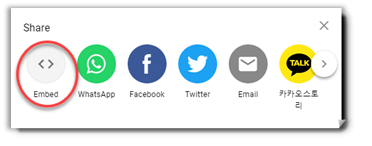
3.7.2 Click “Embed”.
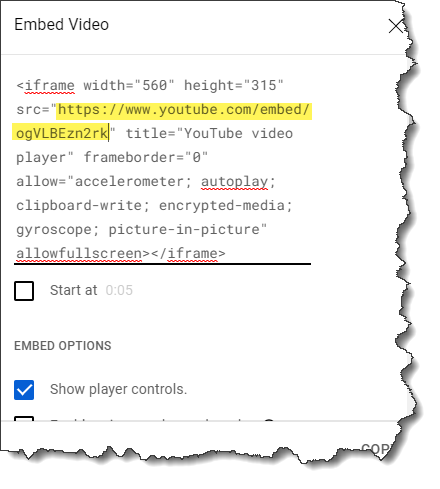
3.7.3 Copy what is in between the first quotes starting with https: as illustrated below.
3.7.4 Return to the virtual mentoring platform and paste the link or embed code into the "Activity Video Link" field.
Images:
3.8 When adding images to your course content, please note that they can only be sourced from the web using image addresses. Uploading or copy-pasting JPEG or PNG images directly is not supported.
Note: To find suitable web images, you can utilize free stock photo websites like https://www.pexels.com/
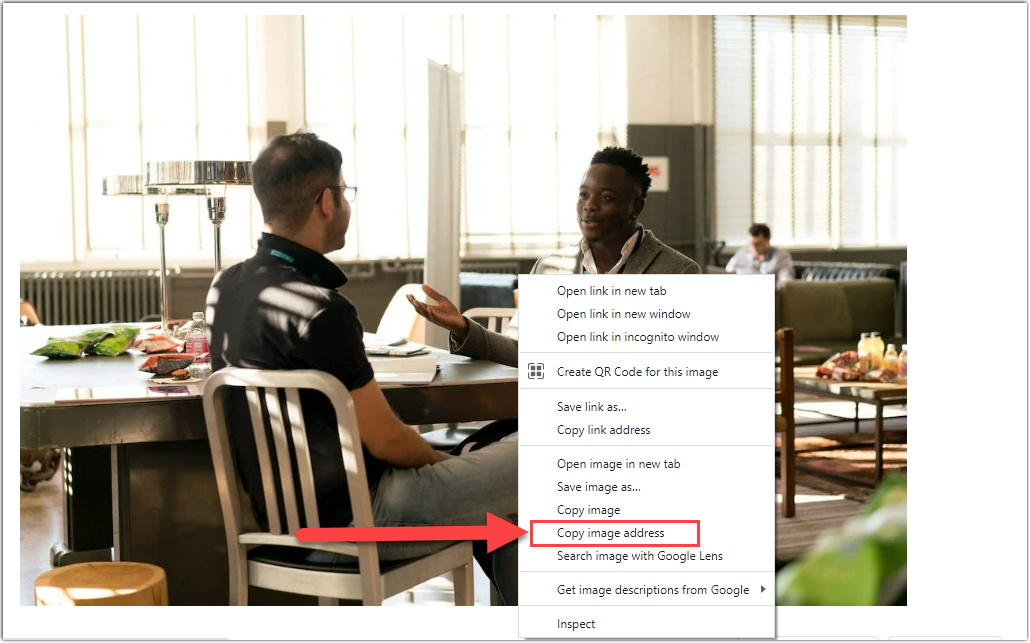
3.8.1 Find a web image that you would like to include and right-click on the image.
3.8.2 Select "Copy Image Address" from the menu that appears.
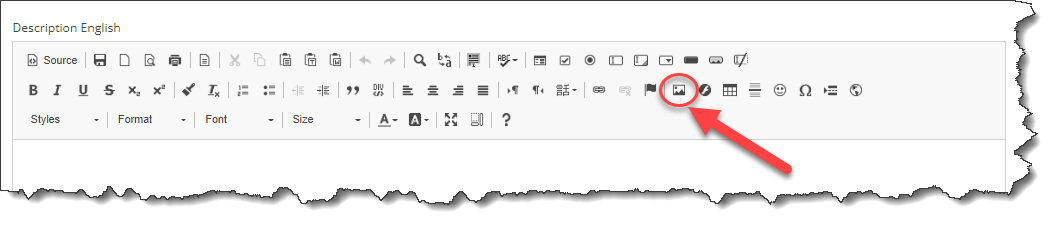
3.8.3 Click this icon on the activity box.
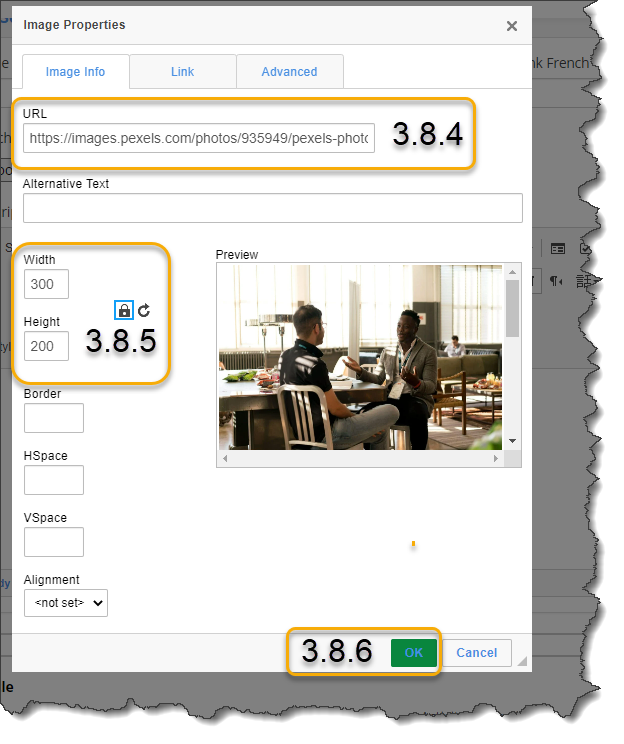
3.8.4 Paste the copied image address in the "URL" field and press the Tab key.
3.8.5 Adjust the width and height of the image as desired. It is recommended to set the width between 300-500 pixels, while the height will automatically adjust to maintain the aspect ratio.
3.8.6 Click Ok
3.8.7 Repeat the same process in the French Section if your course is offered in bilingual format.
Embed Iframe Content
3.9 The virtual mentoring platform offers the capability to embed external content, such as online courses from a website or a Learning Management System (LMS). To successfully embed external content, it must be in the form of an iframe and the website or LMS where the content is hosted must allow embedding via iframe. This ensures compatibility and seamless integration of external course materials within the platform.
3.9.1 Locate the URL of the content you wish to embed. This URL serves as the link to the external content that you want to incorporate within your course modules.
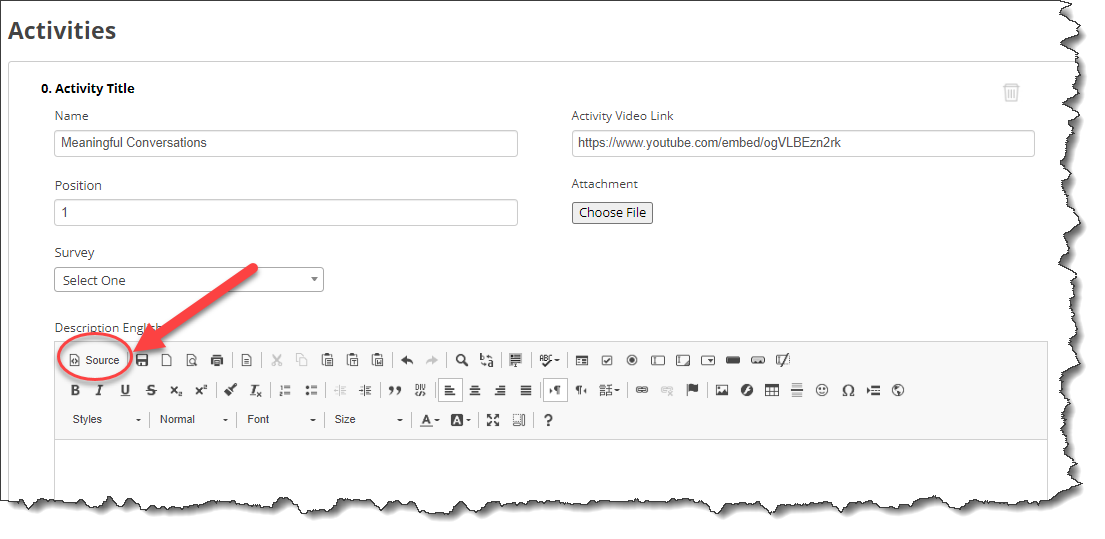
3.9.2 Click on “Source” from the activity Description section.
3.9.3 In the body of the activity Description, copy and paste this formula:
<iframe src="" frameborder="0" width="100%" height="672"></iframe>
3.9.4 Add the URL between the quotes.

It should look like this, once the URL has been added between the quotes:
<iframe src="https://orientation-sga.mentoringcanada.ca/" frameborder="0" width="100%" height="672"></iframe>
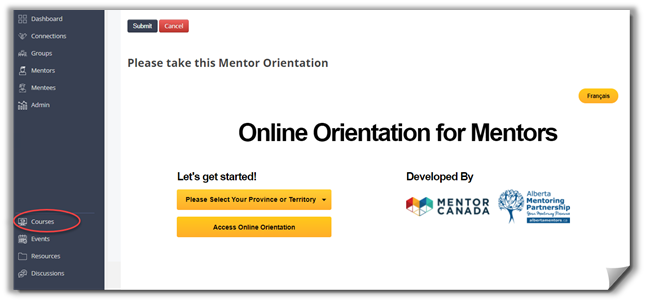
3.9.5 After making the necessary adjustments, click on the Save button to save your changes. To verify the results, navigate to the "Courses" section from the left-hand side menu. If all the steps were executed correctly and the external website permits content embedding via iframe, you should observe a result similar to the example shown below. This confirms that the embedded content is properly displayed within the course module.
Attach a File
3.9.6 To attach a file to an activity, access the activity box and click on Choose File located under the "Attachment" section. This allows you to select a file from your computer and attach it to the specific activity.
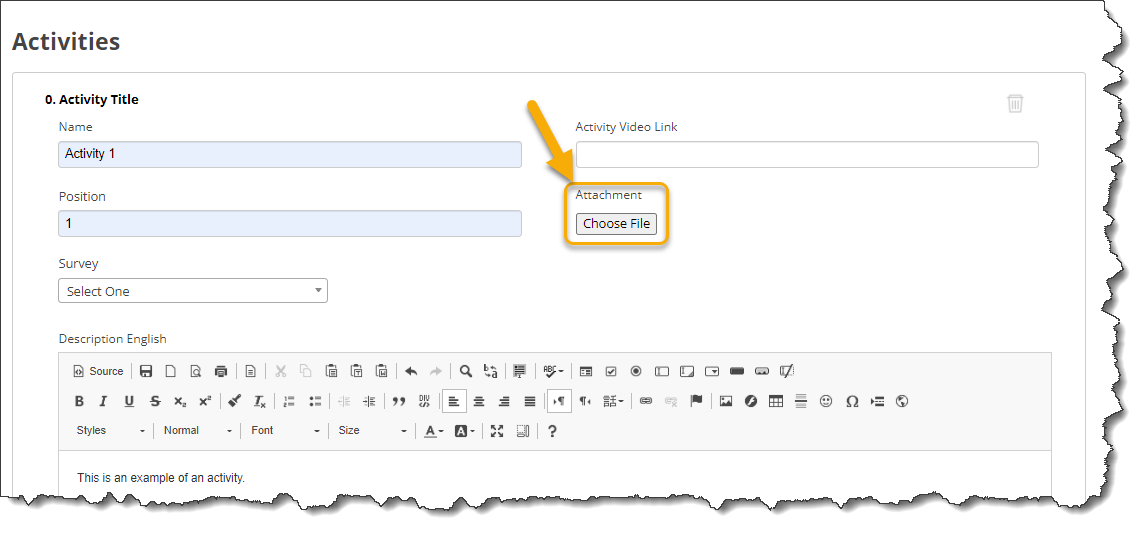
3.9.6.1 Browse through your computer or cloud storage to locate the desired file. Once you have found the file, click on Open to proceed with the attachment process.

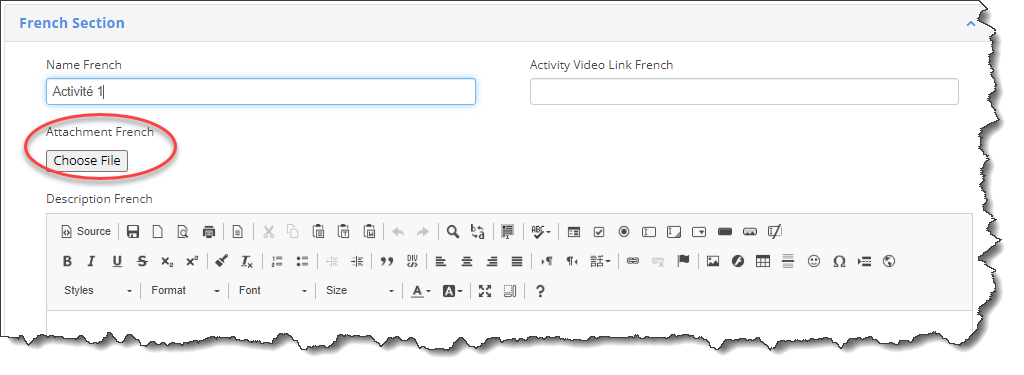
3.9.6.2 Repeat the same process in the French Section if your course is offered in bilingual format.
Note: When attaching a file, it is important to provide context by pairing it with relevant text in the description box. This additional text will offer the end user valuable information about the attachment, including its purpose, usage, and significance. By providing descriptive text alongside the attachment, you enhance the overall understanding and usability of the attached file for the course participants.
3.9.6.3 Click Save
Attach a Survey
3.9.7 To attach a survey, ensure that you have created a survey beforehand. Please refer to the relevant article on how to create a survey within the platform.
3.9.7.1 Click on the drop-down menu in the "Survey" field and choose the appropriate survey title from the provided options. This associates the selected survey with the activity, allowing participants to easily access and complete the survey as part of their course experience.
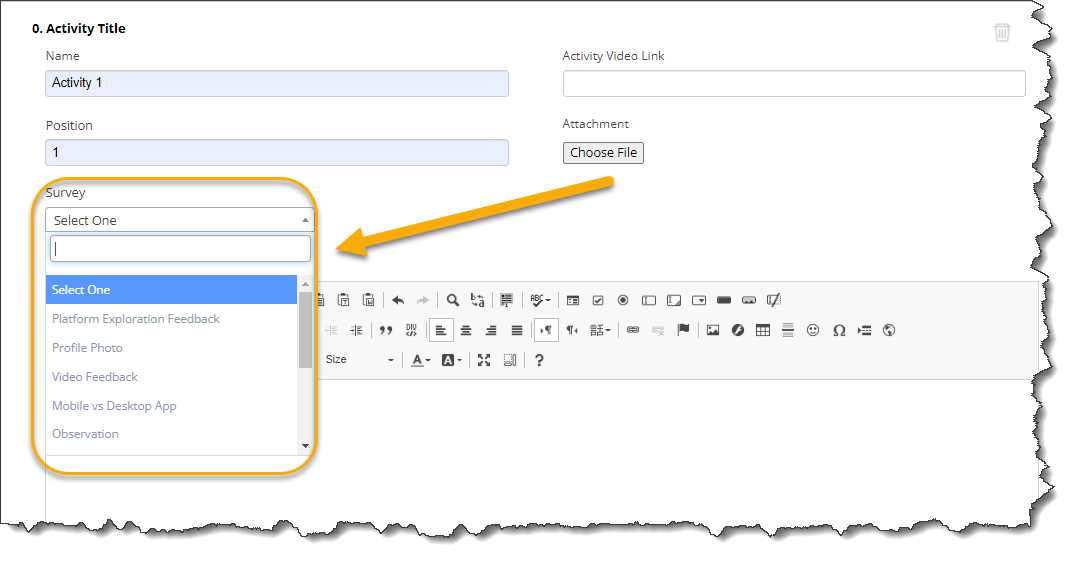
3.9.7.2 Click Save
Add a Quiz
3.9.8 Please note that the system does not offer a dedicated quiz functionality. However, you can utilize surveys to create quiz-like experiences for mentors and mentees. By creating a survey with quiz-type questions, you can effectively assess their knowledge and understanding. This allows you to leverage the survey feature as a workaround for conducting quizzes within the virtual mentoring platform.
3.9.8.1 Follow steps 3.9.7 to 3.9.7.2 above.
Note: Ensure to test your content at every stage of building courses, modules, and activities to ensure desired results. To do so, simply click on the "Courses" tab located at the bottom left-hand side of the virtual mentoring platform. This allows you to view the courses as end users would, enabling you to evaluate the content's presentation, functionality, and overall user experience.
Step 4 – Add Badges to Courses
By incorporating badges into courses' modules, mentors and mentees have the opportunity to earn badges upon completing each module. This serves as an effective method for tracking course completion progress. The inclusion of badges incentivizes engagement and provides a visual representation of the participants' achievements, enhancing the overall tracking and recognition of their progress within the courses.
The Badge Reward System must be activated prior to completing the steps below. Refer to the Activate & Customize the Badge Reward System article to learn how to turn it on.
4.0 To add badges at the bottom of each module, navigate to the modules page and click on the "Edit" button corresponding to the desired module.
4.1 Continue scrolling down on the module page until you come across the Badges section. This section allows you to manage and configure the badges associated with the module.
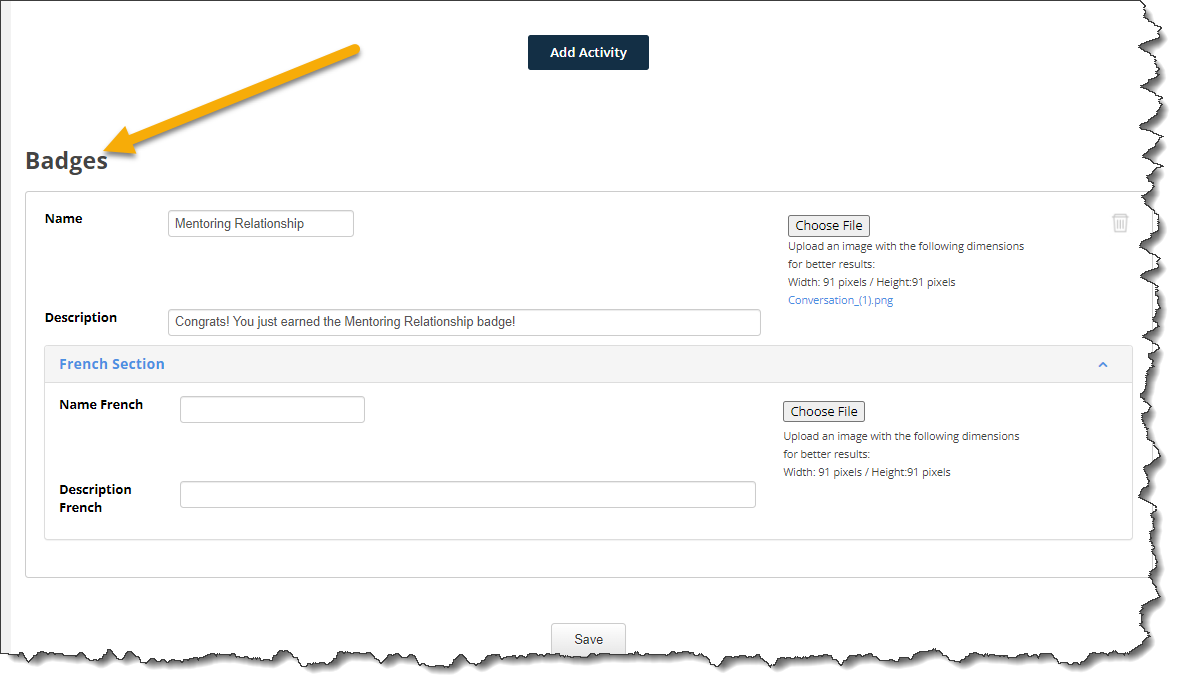
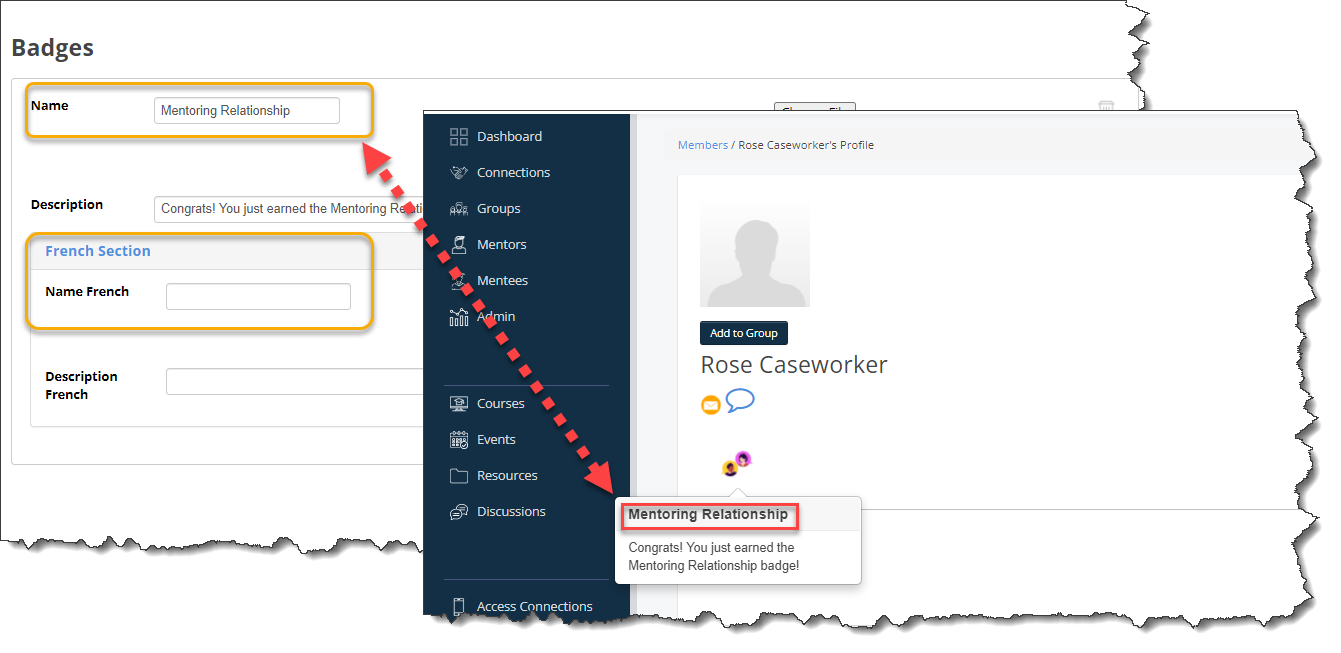
4.2 In the "Name" field, enter a descriptive title for the badge. This title will be displayed on the mentors and mentees' profile overview, specifically in the earned badges section. It serves as a recognizable identifier for the badge, providing a clear indication of the accomplishment associated with it.
4.3 In the "Description" field, provide a detailed description that will appear on-screen when mentors and mentees earn the badge. This description should effectively convey the significance and criteria of the badge, offering a meaningful explanation to recipients.
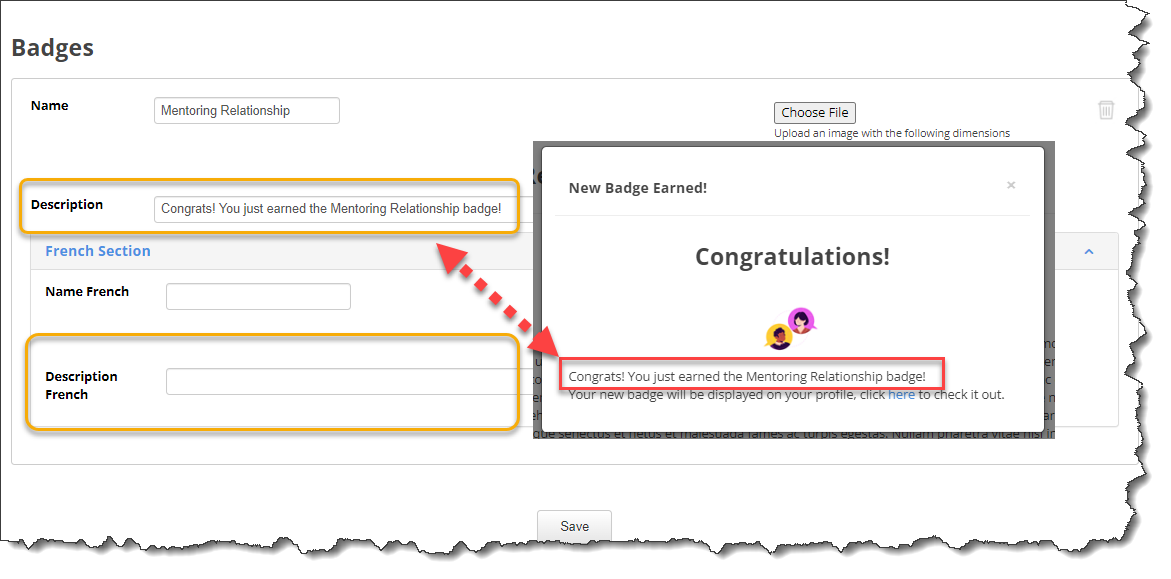
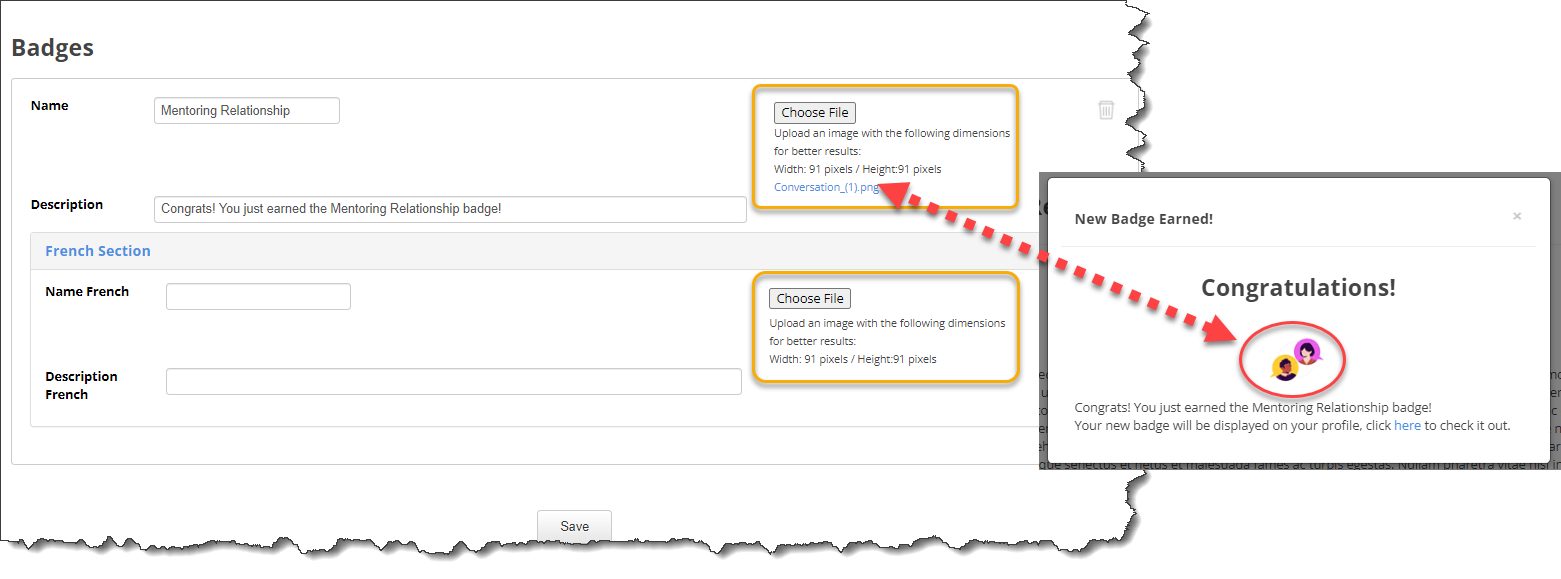
4.4 To associate an image with the badge, click on Choose File and select the appropriate image file. This image will be displayed on-screen when mentors and mentees earn the badge, providing a visual representation of their accomplishment. The chosen image adds a visually appealing element to the badge, enhancing the overall recognition and sense of achievement for the recipients.
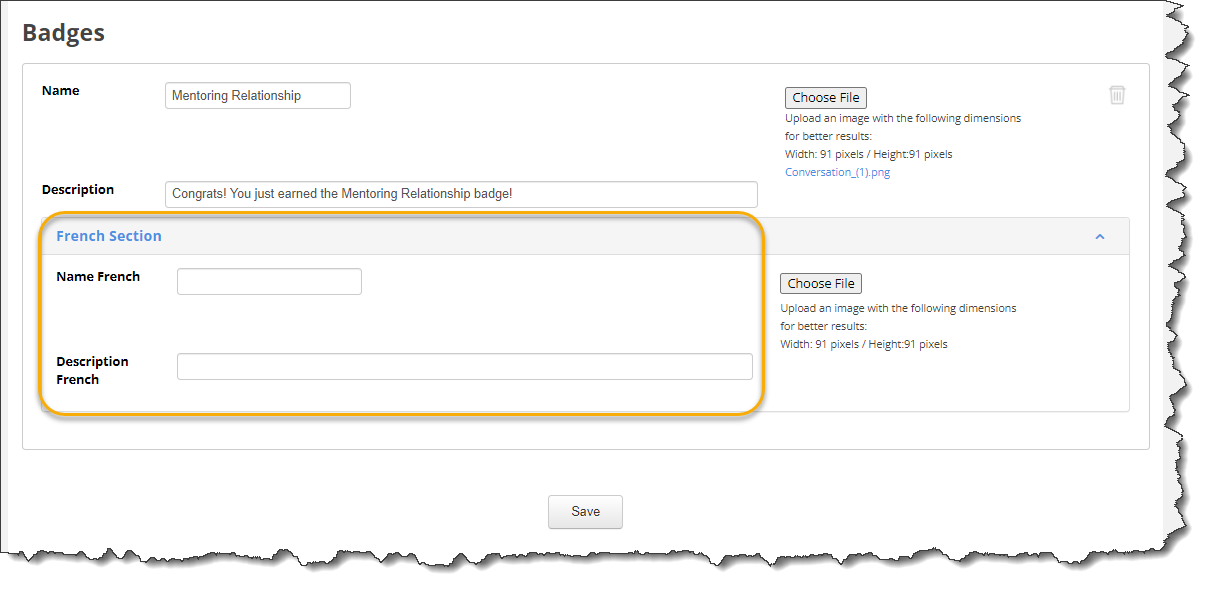
4.5 Repeat the same process in the French Section if your course is offered in bilingual format.
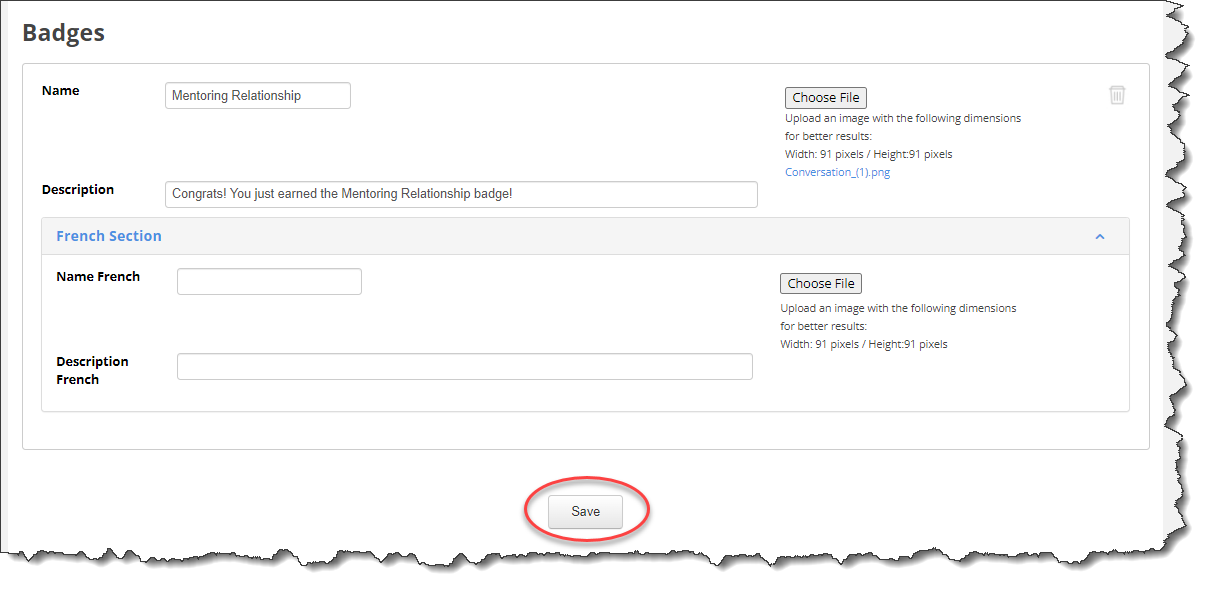
4.6 Click Save and repeat step 4.1 to 4.6 for each module.
Track Earned Badges
4.7 To track the badges that have been earned, you can refer to the following sections:
- Members section of the administrator dashboard: This section provides an overview of all the members in the program, allowing you to view their profiles and badge accomplishments.
- Members Report: This report provides detailed information about the members, including their badge achievements
By utilizing these resources, you can effectively monitor and track the badges earned by mentors and mentees, gaining insights into their accomplishments and contributions.
Members Section
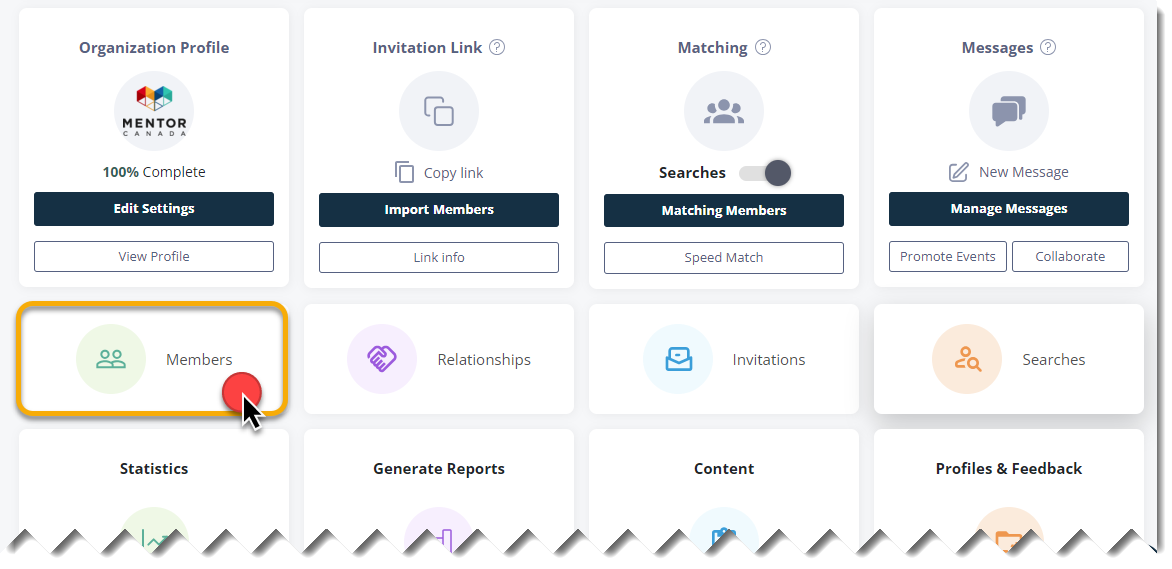
4.7.1 Click on the "Admin" tab on the left.

4.7.2 Click on the "Members" tile located on the second row of the administrator dashboard.
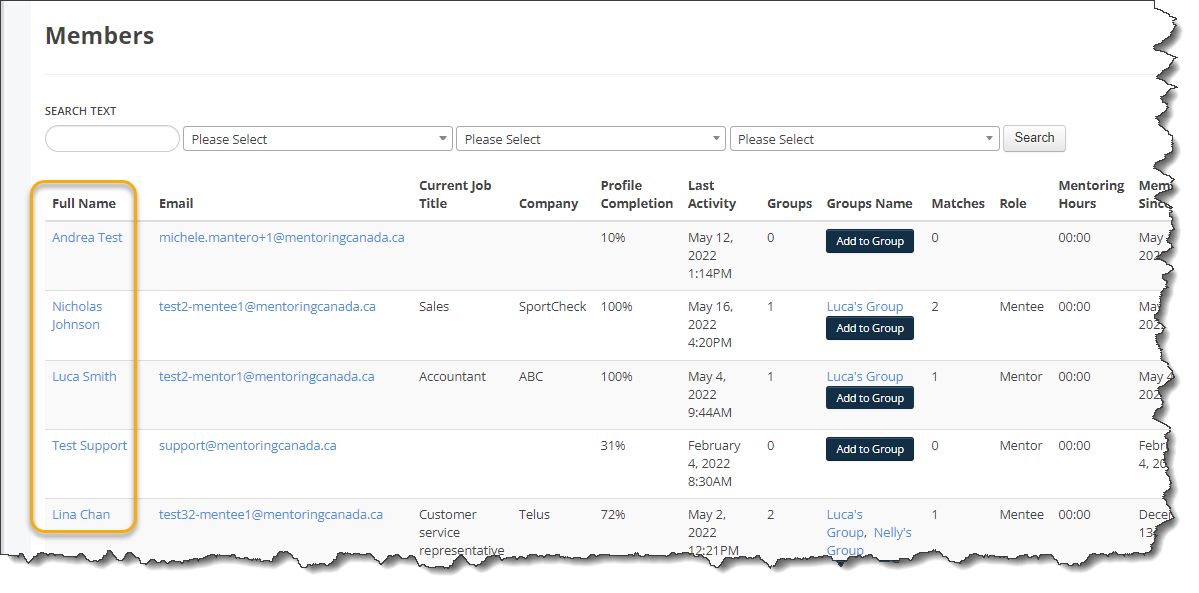
4.7.3 Click on the name of a mentor or mentee listed under the "Full Name" column. This allows you to access their profile and view their badge achievements.
4.7.4 The earned badges will be displayed underneath their name. Hover your cursor over a badge to reveal the badge's name and description. This provides a quick and convenient way to identify and understand the significance of each badge earned by the mentor or mentee.

Members Report
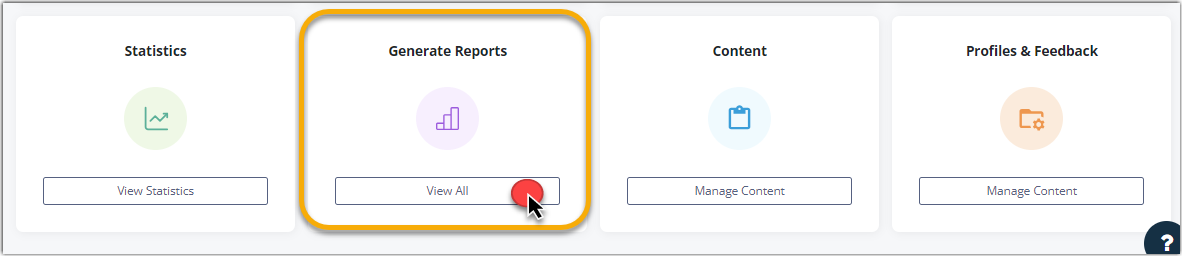
4.7.5 From the administrator dashboard, navigate to the "Generate Reports" tile located on the third row, and click on "View All" to access the corresponding section.
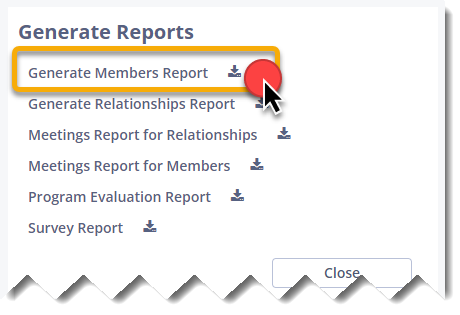
4.7.5.1 A new dialog box will appear. Click on "Generate Members Report".
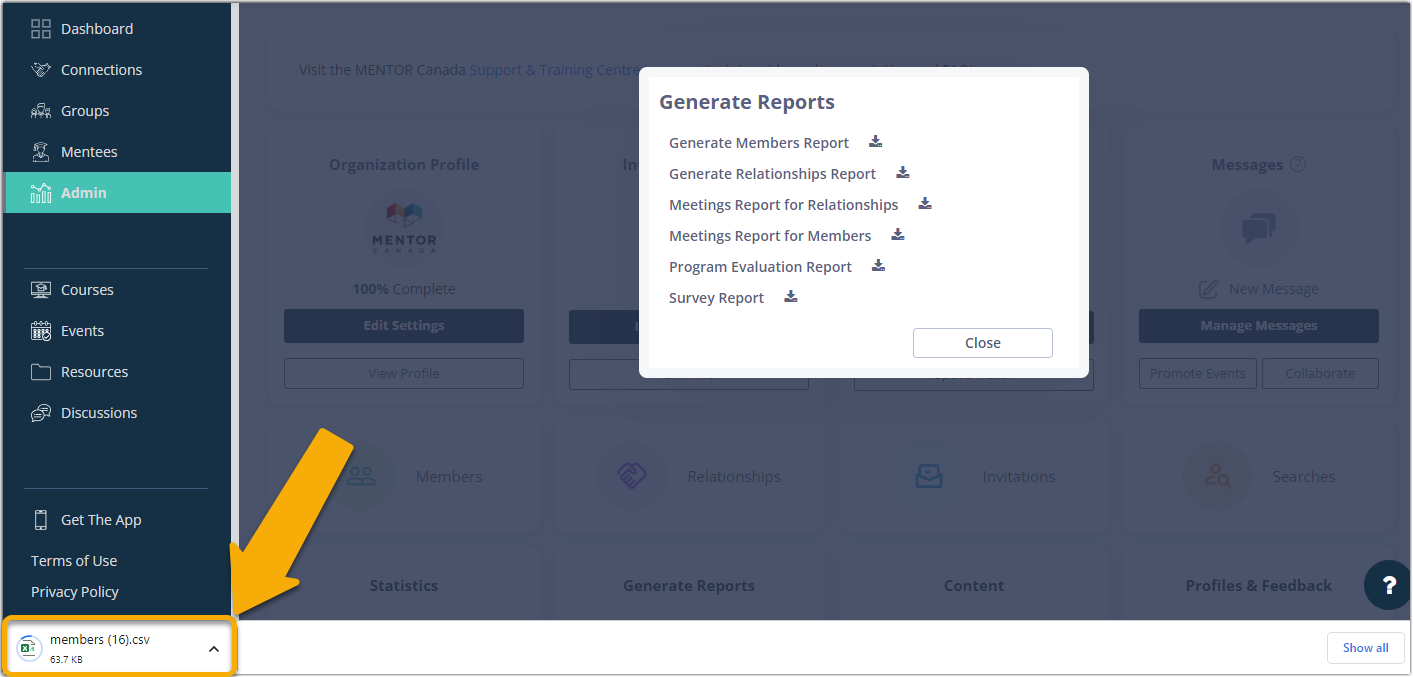
4.7.6 After the process finishes, the system will automatically generate a report in CSV format. You can find this report in your browser's download section, though its location may vary depending on your browser type and version. To access the data within the report, simply click on the document to open it.
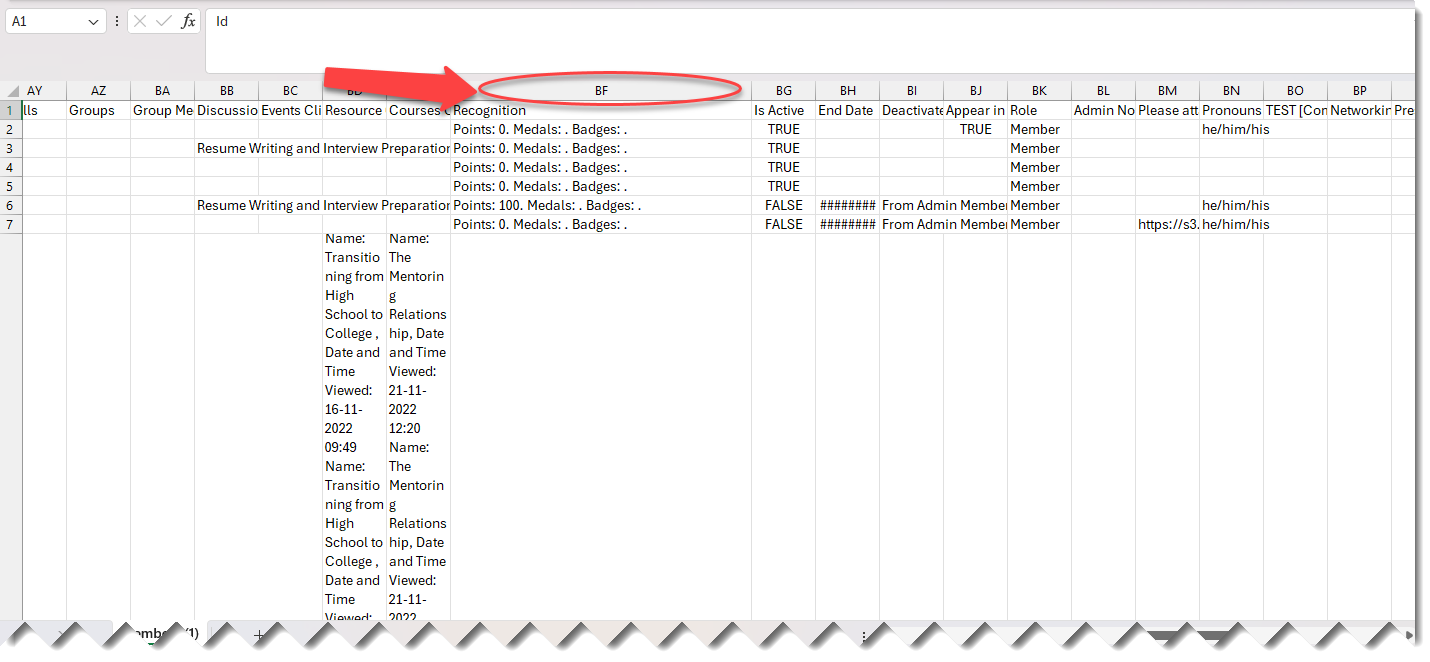
4.7.7 Open the report and look for column BF which contain the badges earned information.
If you have questions or need further support, please contact our Support Team: support@mentoringcanada.ca